Customizing the Management Dashboard of a SaaS Service
Overview
If a custom domain is available, KurocoEdge can be applied even for SaaS. This means that even in parts that cannot be edited normally, you can customize them by applying KurocoEdge if you are using a service that allows you to operate the management dashboard on a custom domain.
In this tutorial, we will explain how to customize the management dashboard of WordPress using KurocoEdge as an example.
What you will learn
We will explain the following methods:
- Installing KurocoEdge
- Changing the Login Page Logo Image
- Changing the destination when the logo is clicked
- Hiding unnecessary header menus
- Changing the label of the side menu
- Adding a link to the side menu
- Changing the order of the side menu
- Removing unnecessary blocks from the dashboard
- Hiding the Parent Category Setting
Prerequisites
Due to the issue of Cross-Site Request Forgery, the login function will not work if the KurocoEdge domain and the WordPress URL do not match.
Before setting specific rules, you need to match the KurocoEdge domain with the WordPress management dashboard domain.
Installing KurocoEdge
Adding a Backend URL
Add the domain of your WordPress site to the KurocoEdge management dashboard.
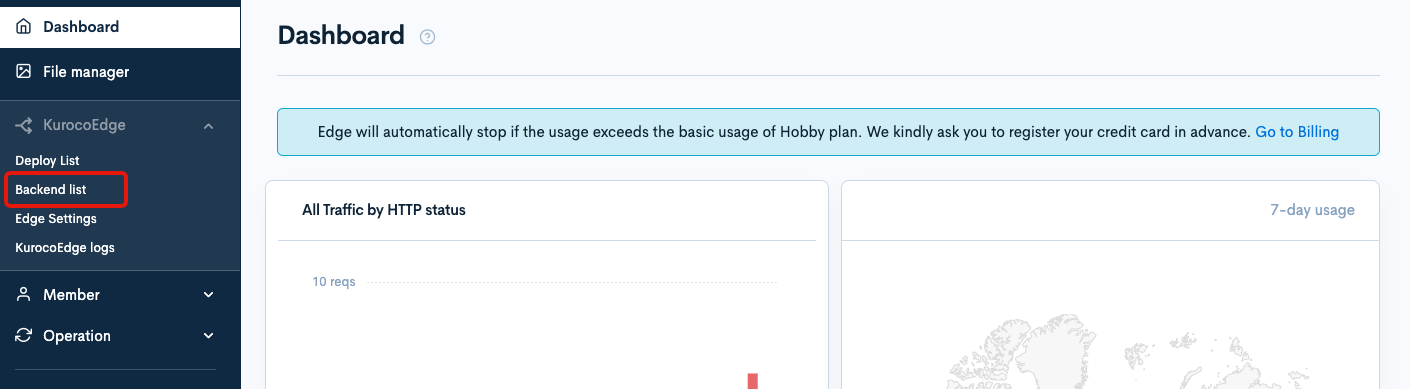
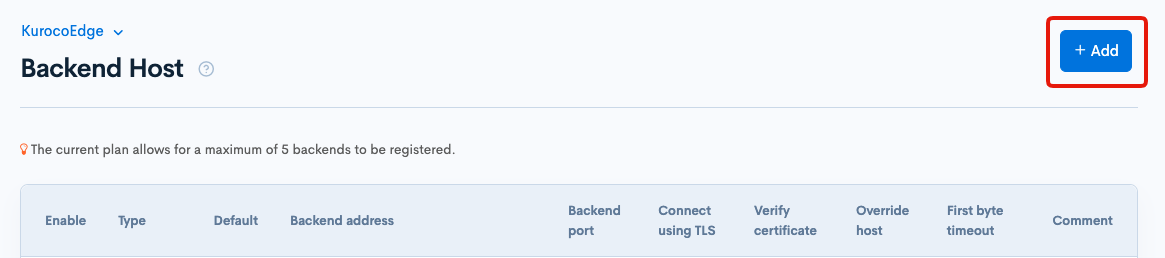
Click [KurocoEdge] -> [Backend List] in the side menu.
Click the [Add] button in the upper right corner of the Backend List page.
The backend host addition screen will appear, so configure it as follows:
| Item | Value |
|---|---|
| Backend Address | Enter the IP address of the server where WordPress is installed |
| Backend Port | 443 |
| Override Host | Enter the domain of the WordPress management dashboard |
| Enable TLS Connection | Check the box |
| Enable TLS Certificate Check | Check the box |
| First byte timeout | 15 seconds |
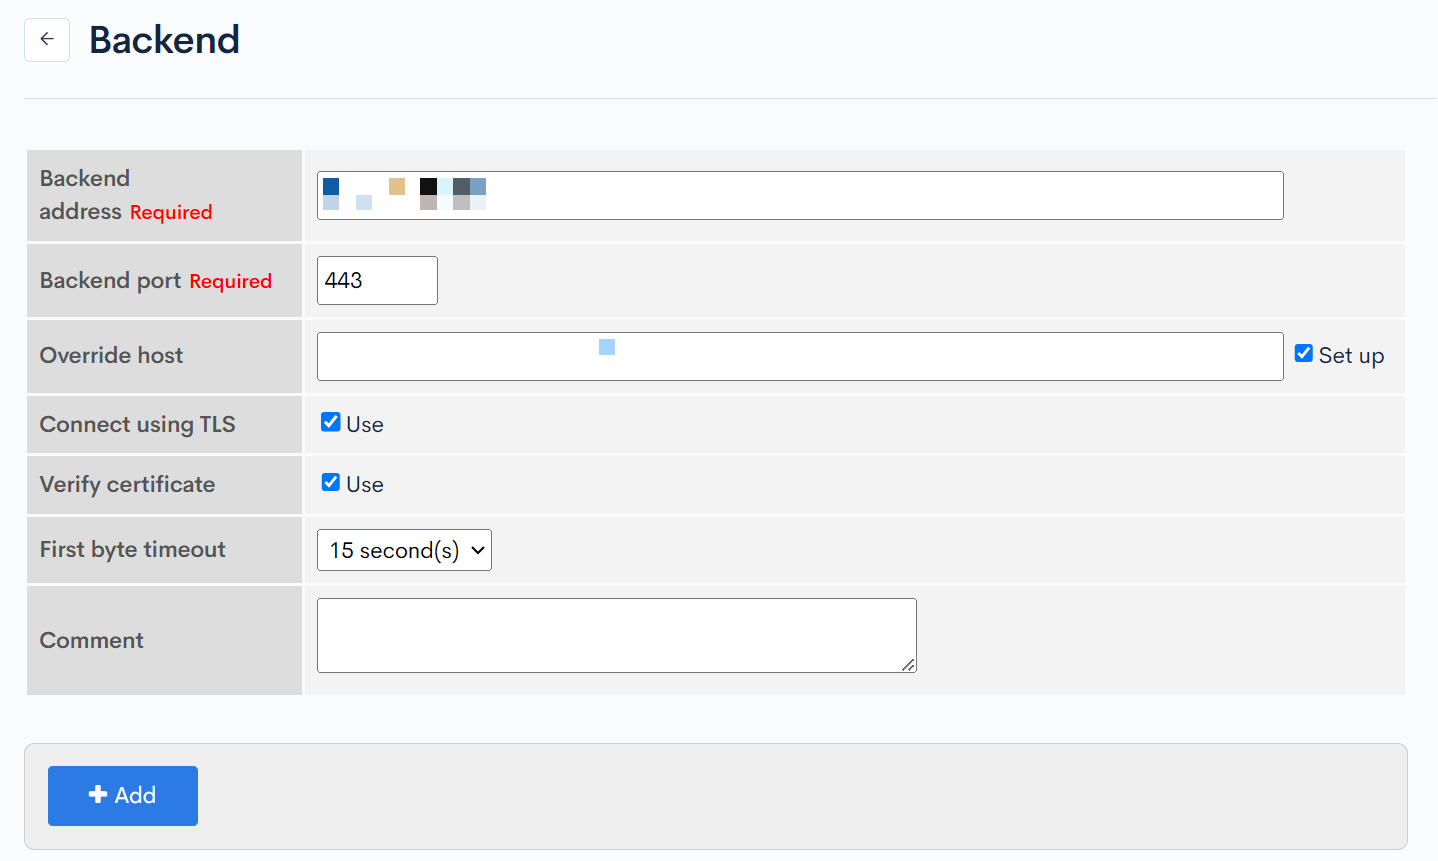
After the configuration is complete, click [Add] to add the backend host.
Creating a Deployment
Prepare a deployment to customize the WordPress management dashboard.
Clone any deployment from the deployment list page and configure the following settings:
| Item | Value |
|---|---|
| Default Backend | Select the IP address of the server where WordPress is installed |
| Rules | Empty |
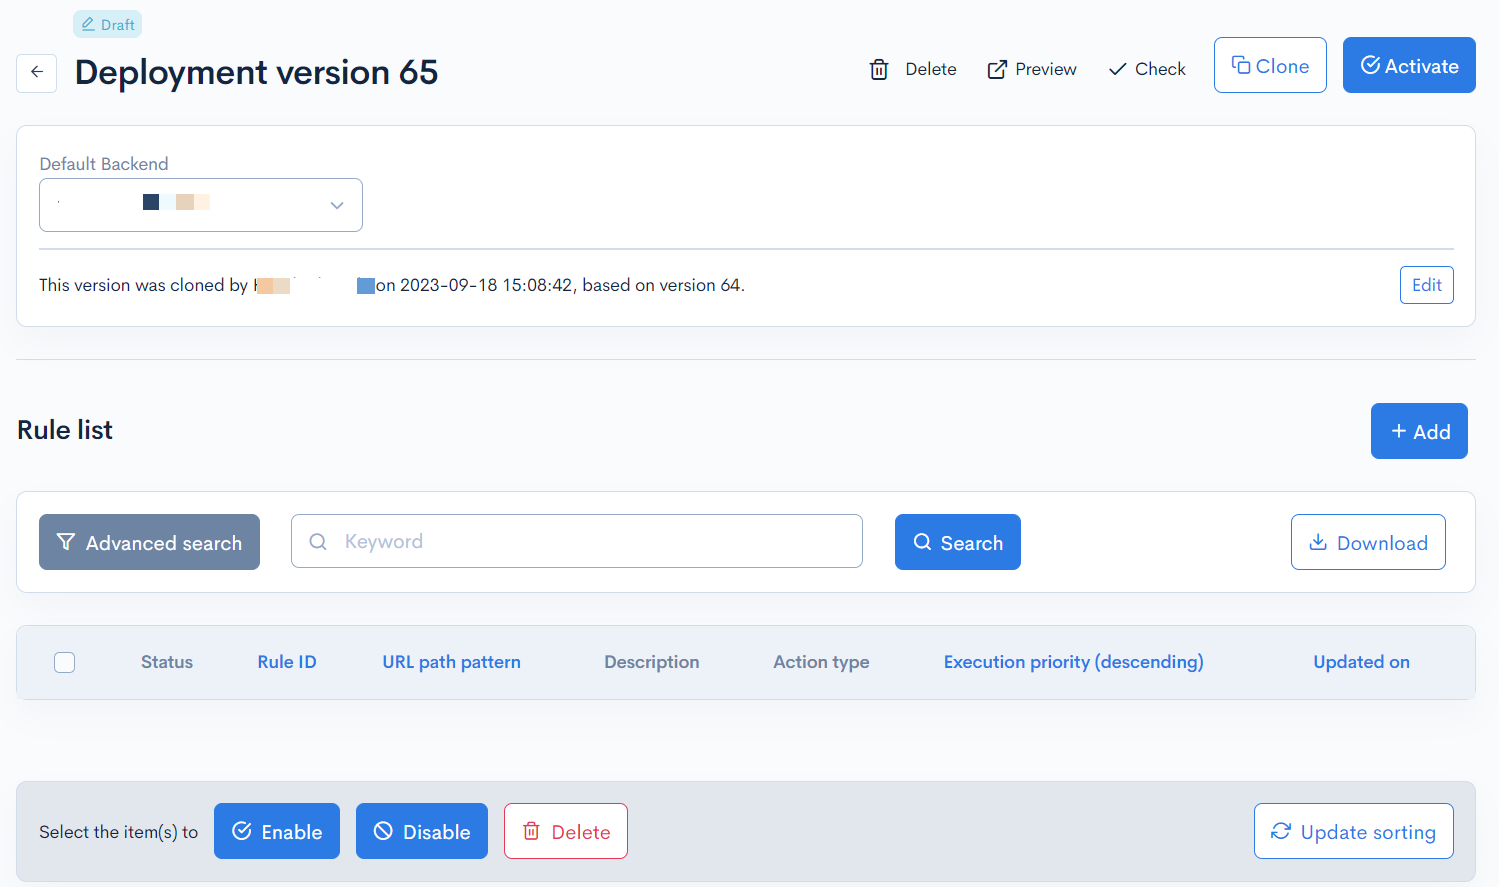
After the configuration is complete, click [Deploy] to start the deployment.
Setting the KurocoEdge Domain
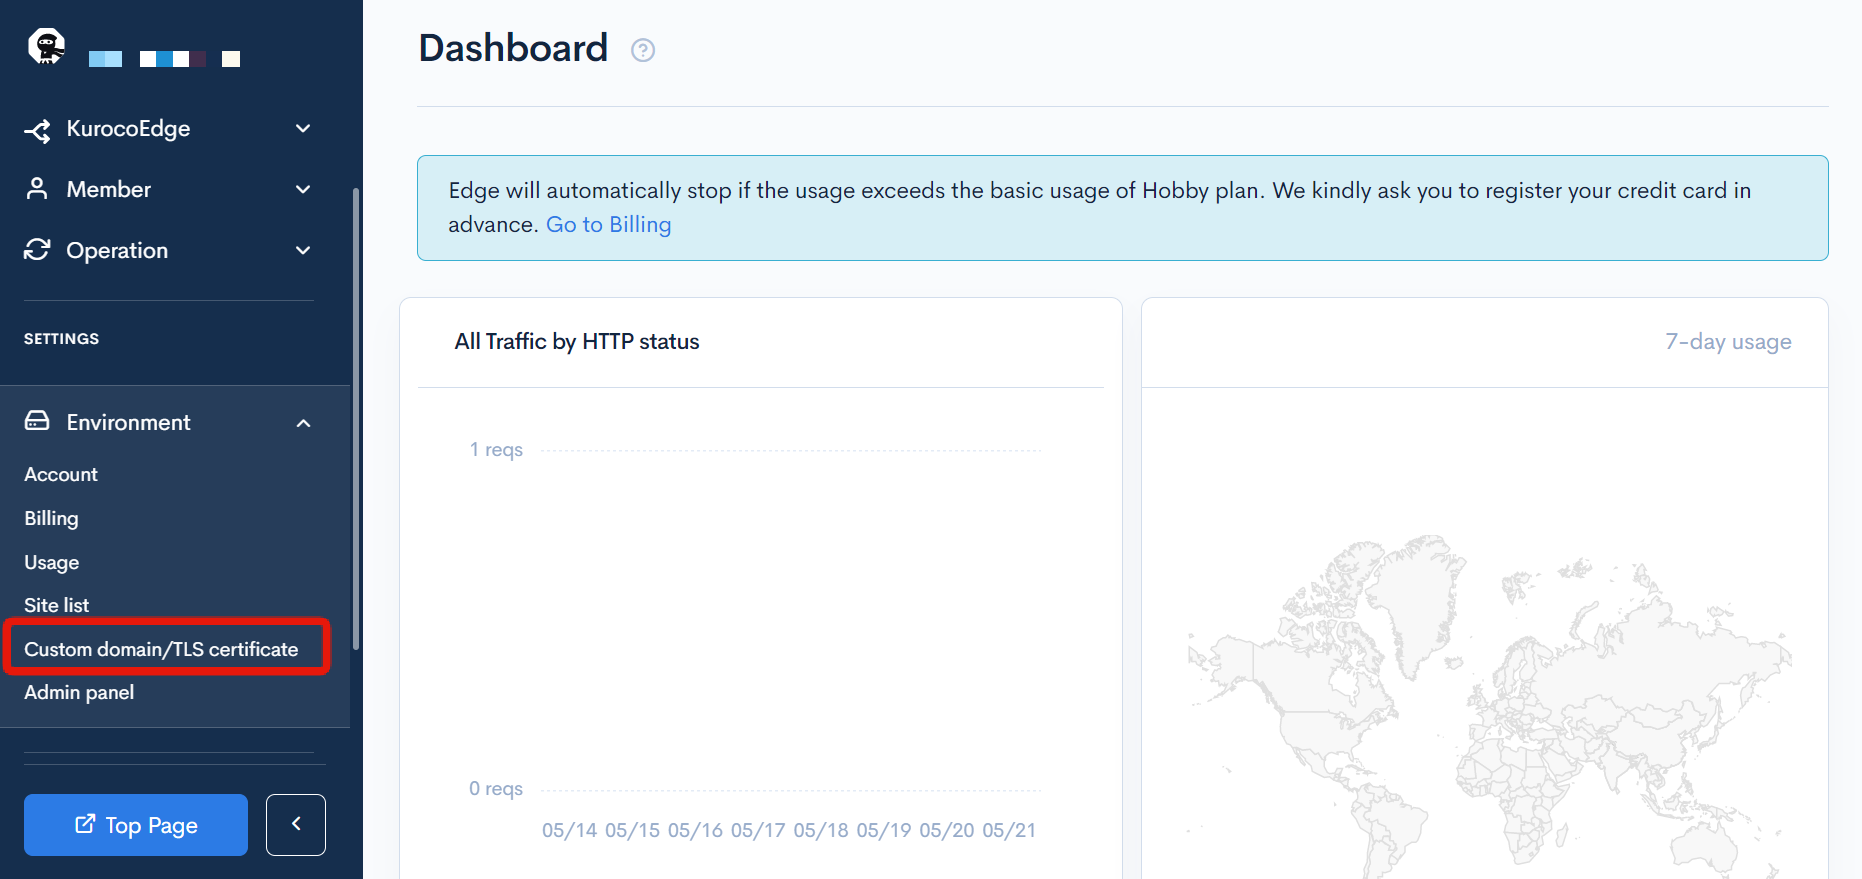
Click [Environment Settings] -> [Custom Domain/TLS Certificate].
Enter the domain of the WordPress management dashboard and click [Add].
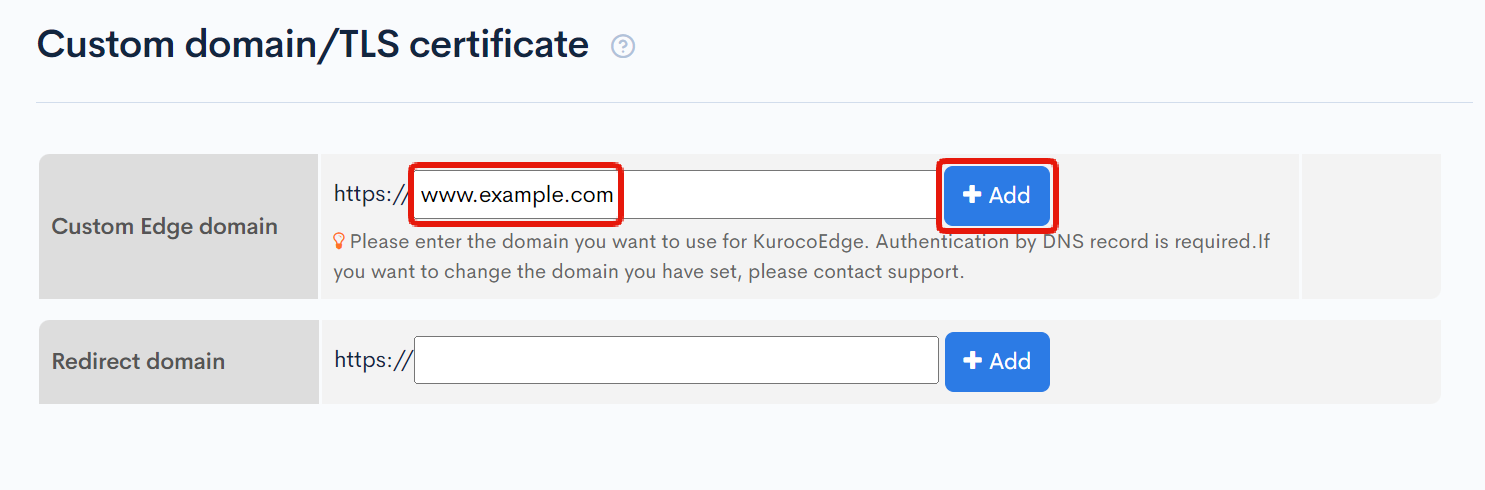
No trailing slashes, directories, etc. are required for the step above.
Once added, the custom domain cannot be changed. If you have entered it incorrectly, please contact support.
Inquiry Form
Setting up DNS records
When you enter your KurocoEdge domain, the DNS settings will be displayed. Set the CNAME settings shown in "Confirming Domain Ownership" and "DNS Records for Using the Domain".
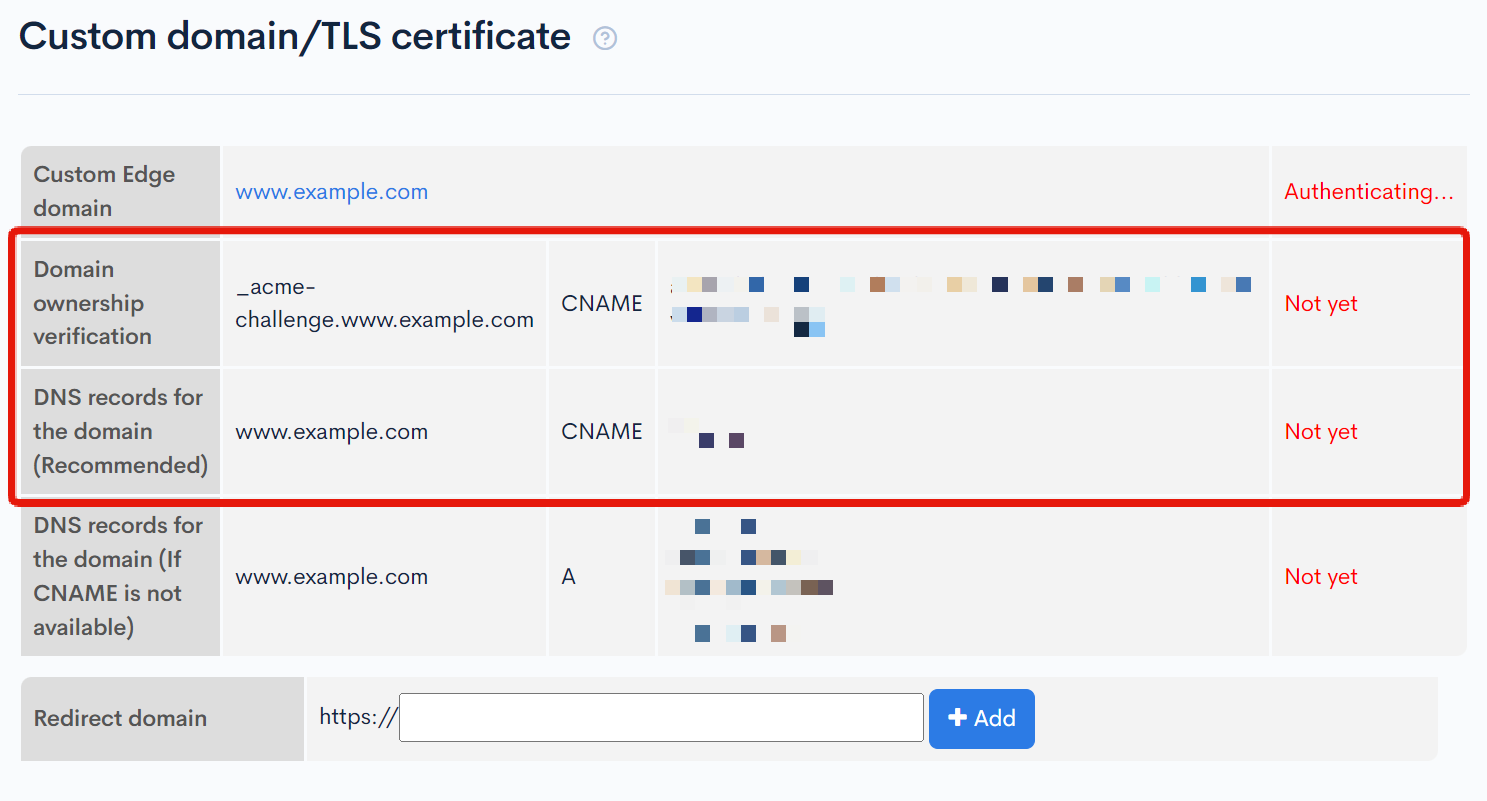
Until the steps in Changing the KurocoEdge Domain are completed, the configured domain will not be displayed.
Wait for the DNS settings to be applied. Once you have confirmed that "Confirming Domain Ownership" is OK, proceed to the next step.
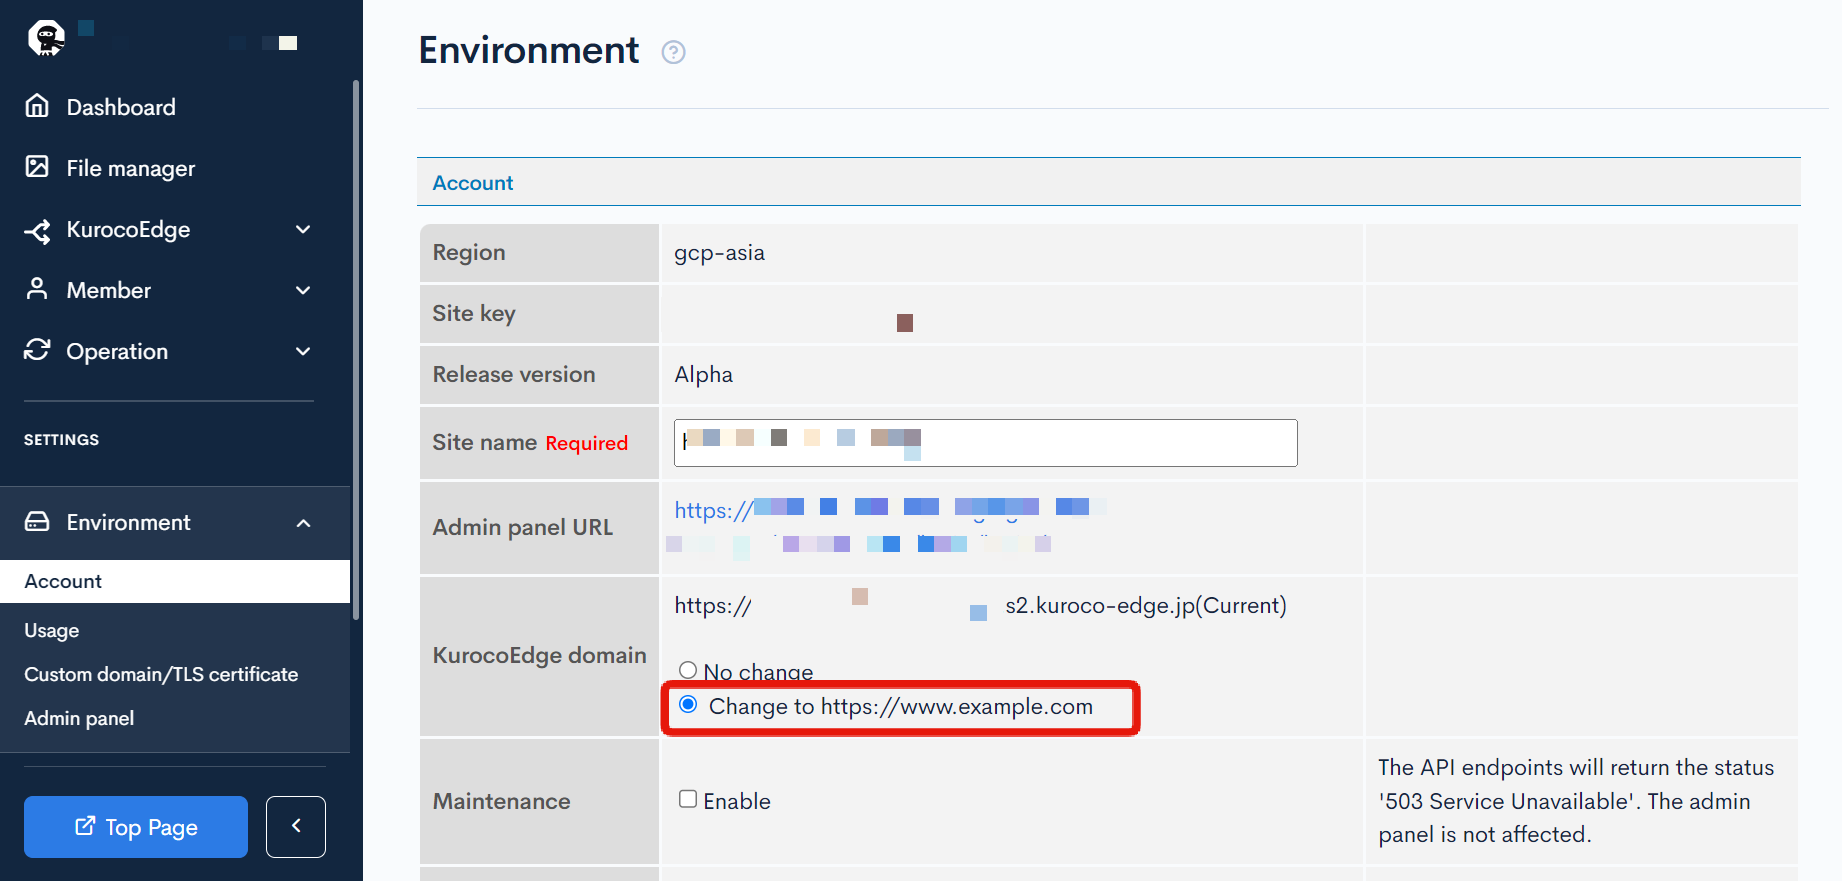
Changing the KurocoEdge Domain
Next, change the Kuroco Edge domain from the account settings.
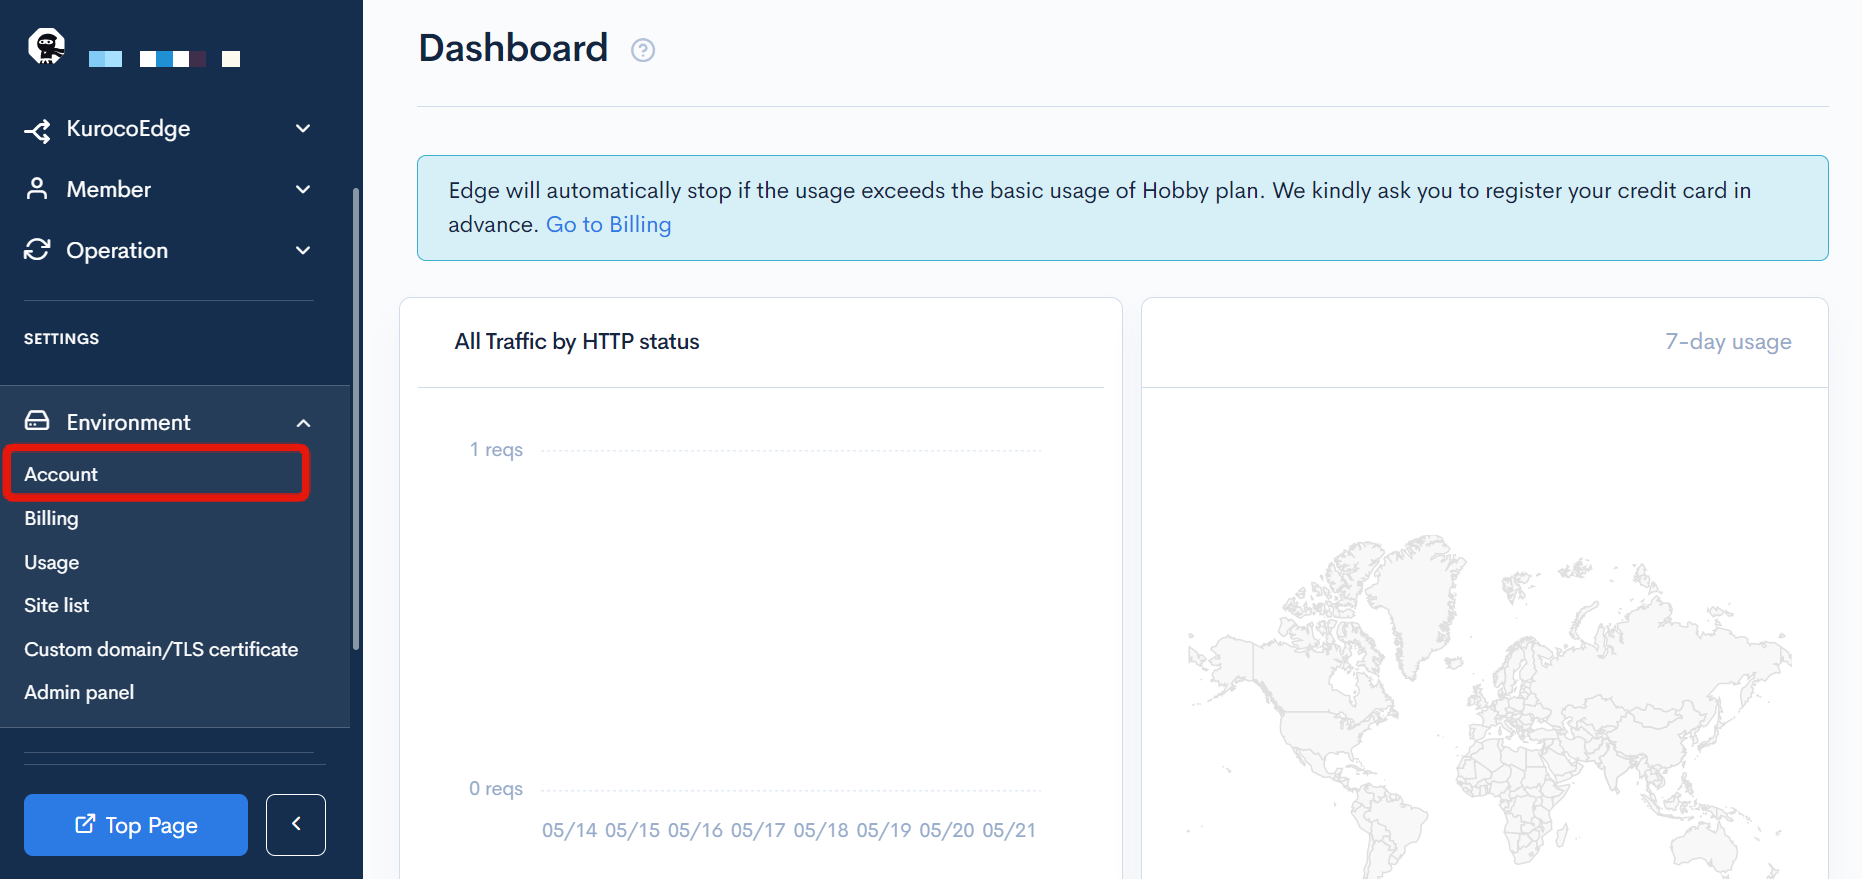
Click [Environment Settings] -> [Account Settings].
Check the custom domain set in Kuroco Edge Domain, and check "Change" and click "Update".
That's it for setting up KurocoEdge.
You are now ready to customize the WordPress admin screen.
Customizing the WordPress Admin Screen
Here are some rules for customizing the WordPress admin screen.
You cannot edit a active deploy, so set the rules after cloning the deployment and check the operation in preview mode.
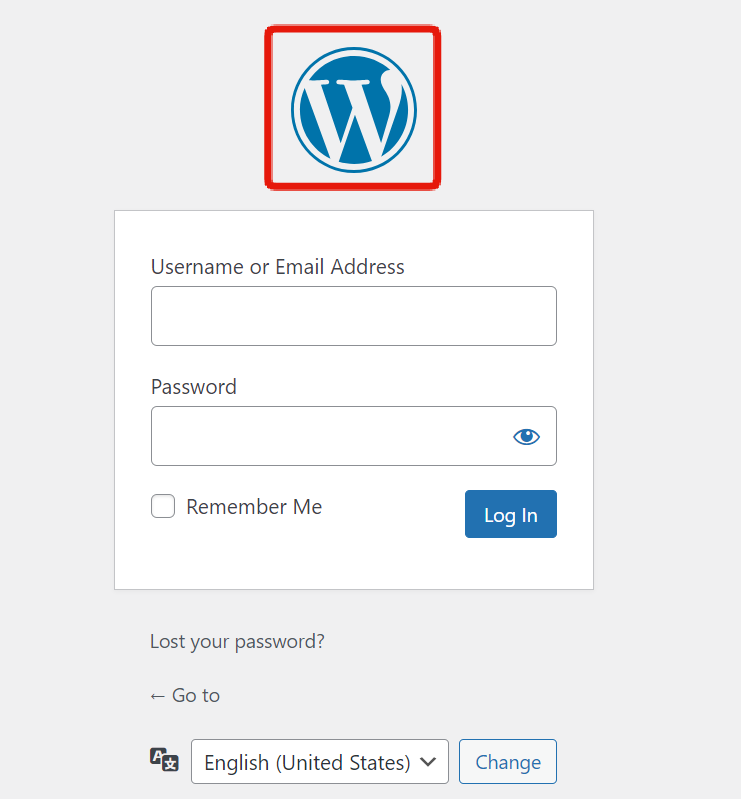
Changing the Login Page Logo Image
Change the logo image on the login page.
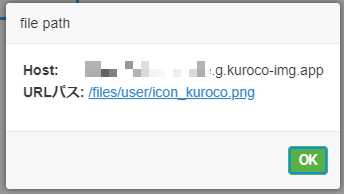
Uploading the Image to KurocoEdge
Click [File Manager] from the side menu.
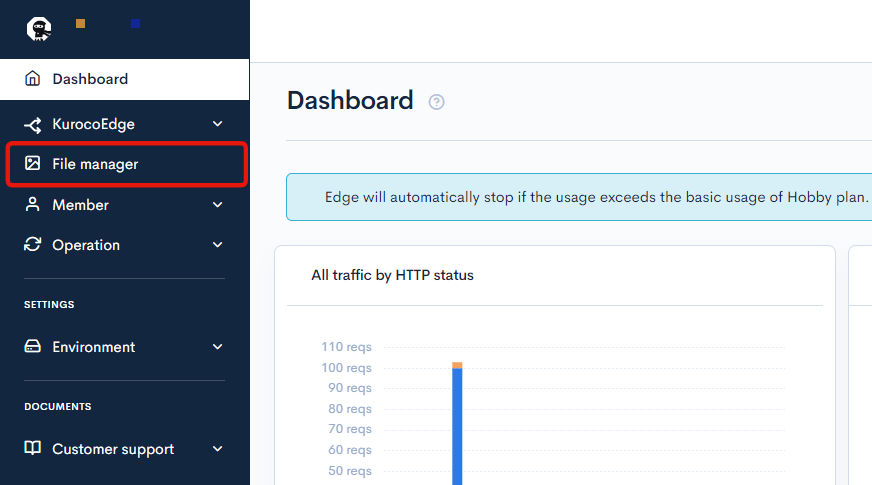
Upload the image to be used for the change.
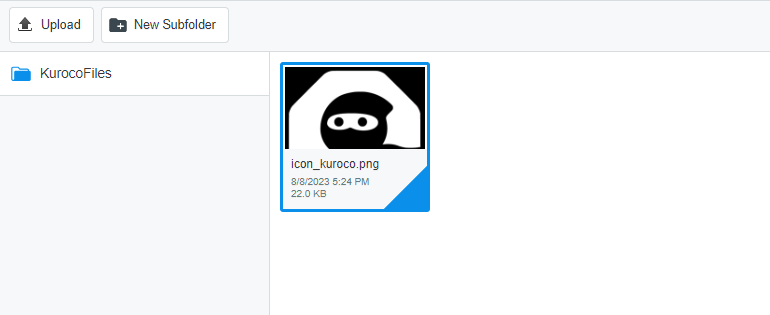
For later use, right-click on the image and click [File Path] in the menu that appears to copy the hostname and URL path that are displayed.
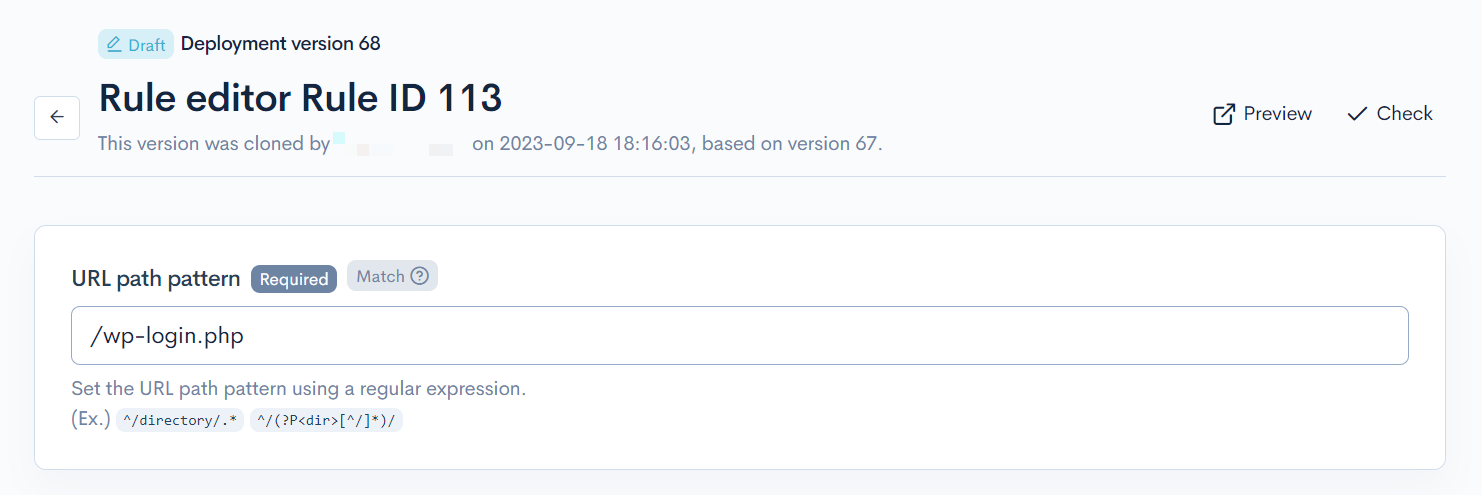
Creating a Rule
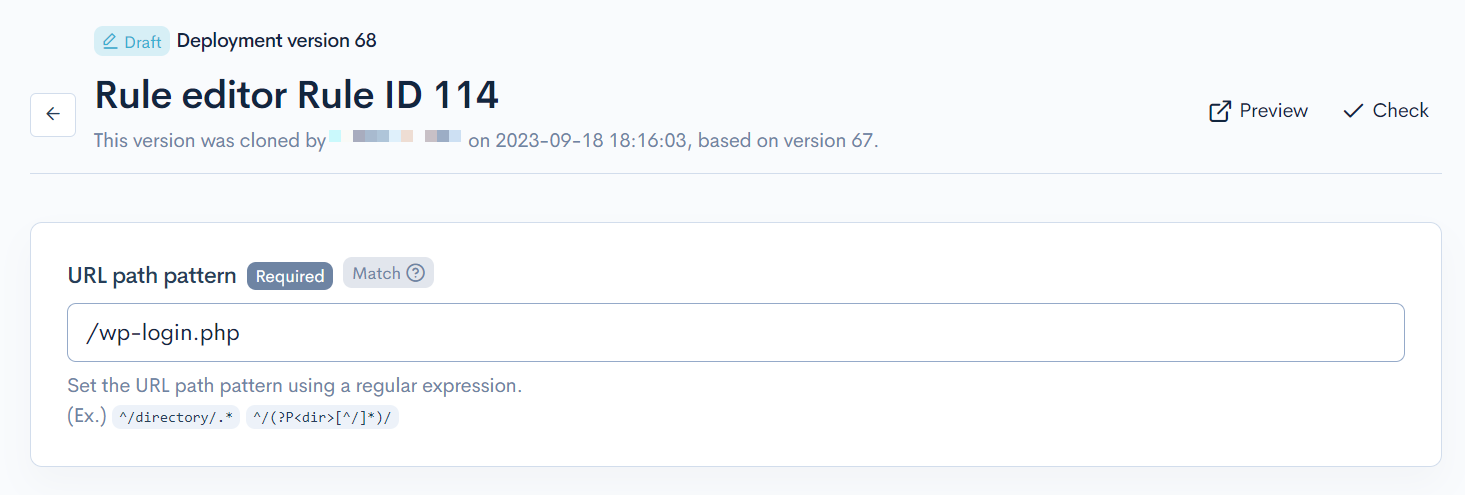
Create a rule as follows on the rule addition screen.
URL Path Pattern to Apply
To limit it to the login page of the admin screen, enter /wp-login.php.
Click on the Response tab and configure as follows.
Execution
| Item | Setting |
|---|---|
| Field setting | HTML editor |
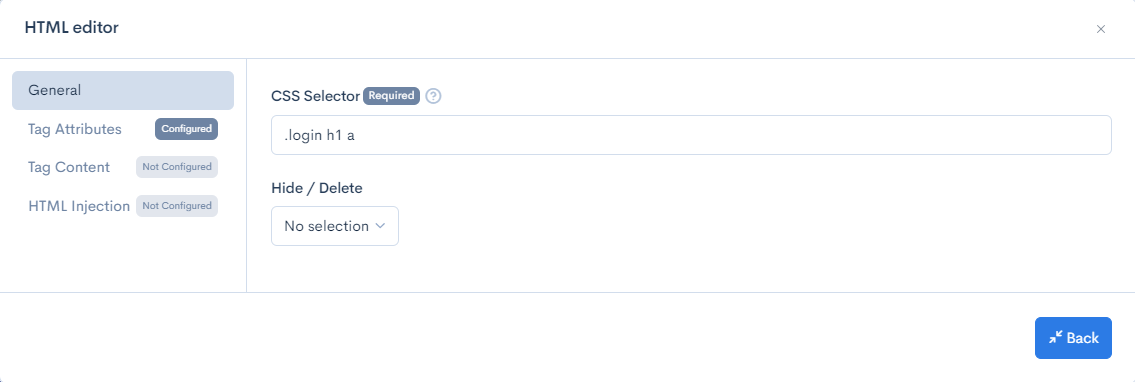
| General | CSS Selector: .login h1 a |
| Tag Attribute | Action: Set Attribute Name: styleValue: background-image:url(hostname+URL path copied from the file manager earlier) |
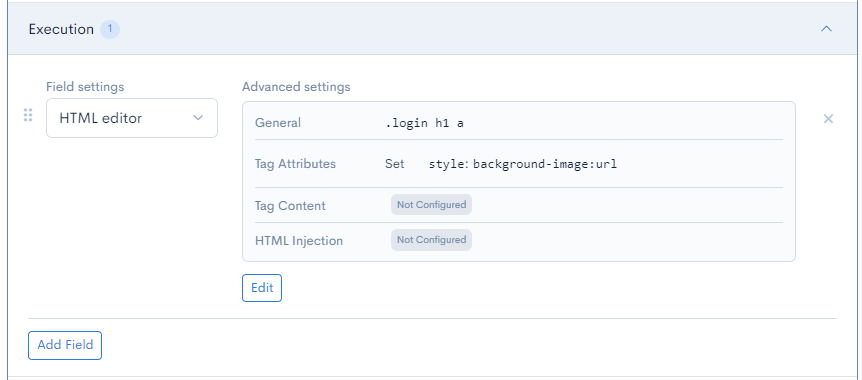
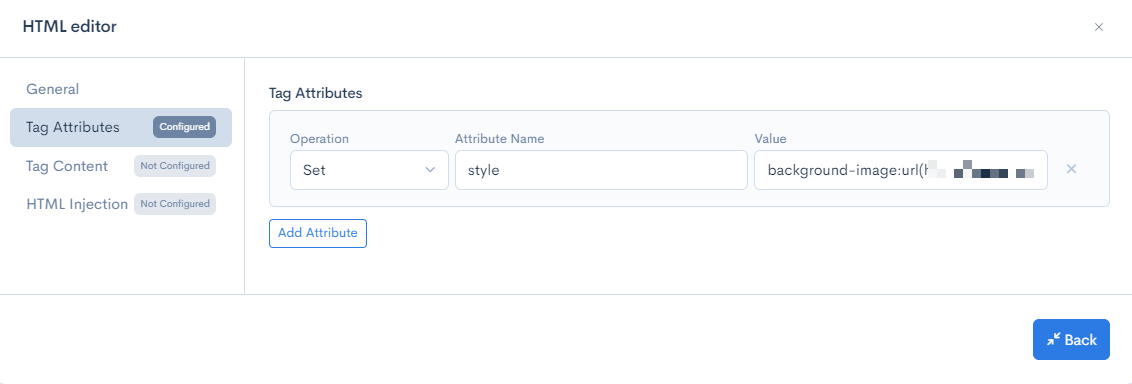
Once the settings are complete, click [Update] to save the settings.
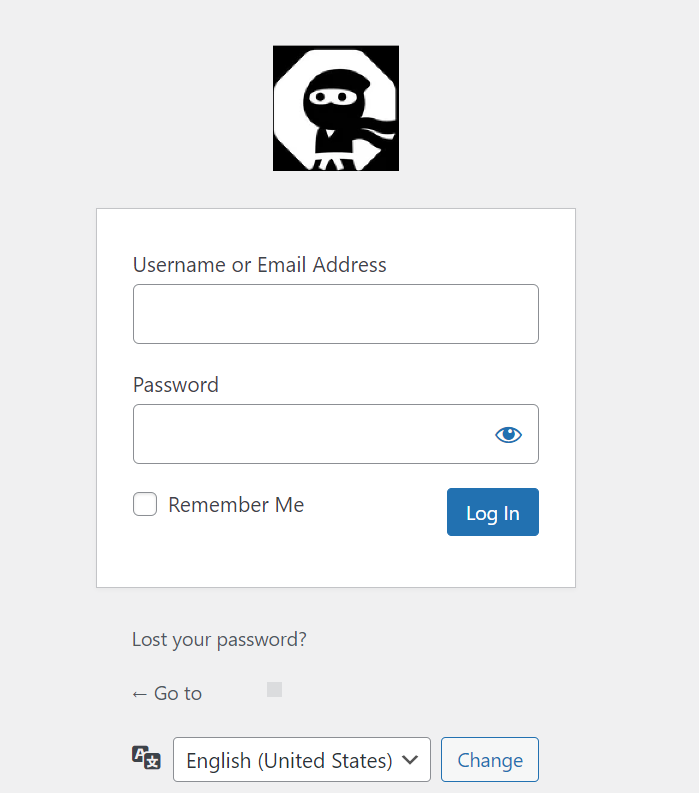
Checking the display
Click the [Preview] button in the upper right corner of the rule editing page to check the display, and you can confirm that the logo image has changed.
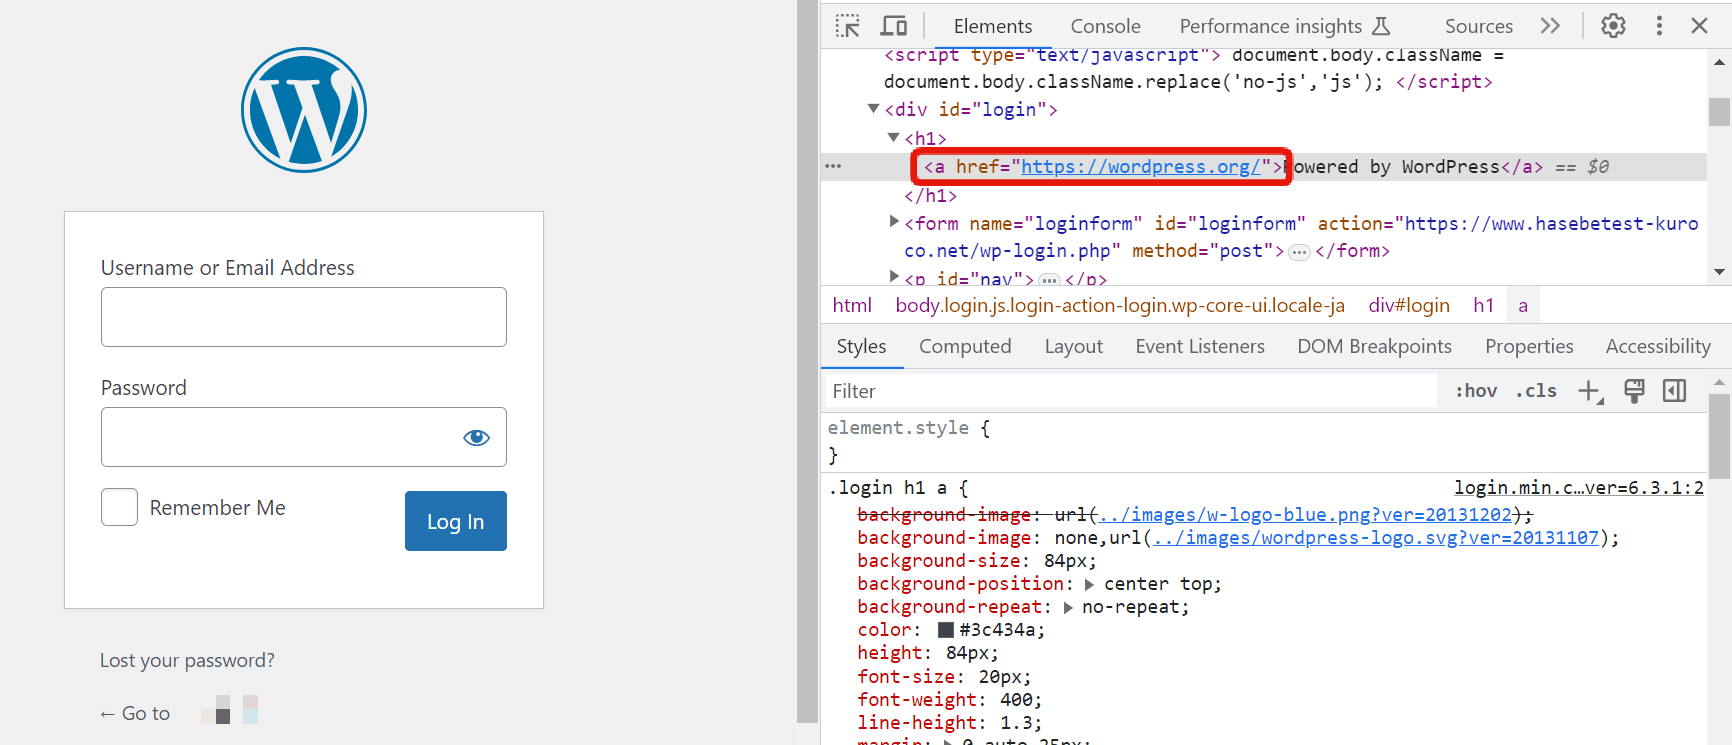
Changing the destination when the logo is clicked
By default, the link destination of the login page logo is https://wordpress.org/ if the site language is English, and https://ja.wordpress.org/ if it is Japanese. In this tutorial, we will change it to https://kuroco.app/ja/ as an example.
Creating a rule
Create a rule as follows on the rule addition page.
URL path pattern to apply
To limit it to the administration login page, enter /wp-login.php.
Click on the Response tab and configure as follows.
Execution
| Item | Setting |
|---|---|
| Field setting | HTML editor |
| General | CSS selector: .login h1 a |
| Tag attribute | Action: Set Attribute name: hrefValue: https://kuroco.app/ |
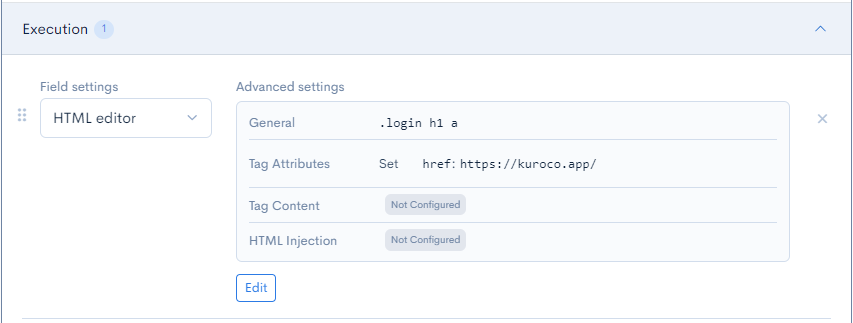
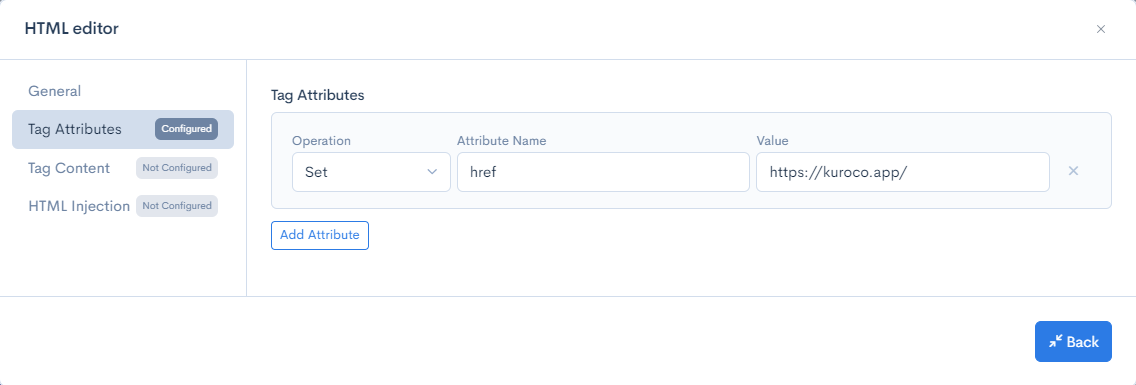
After configuring, click [Update] to save the settings.
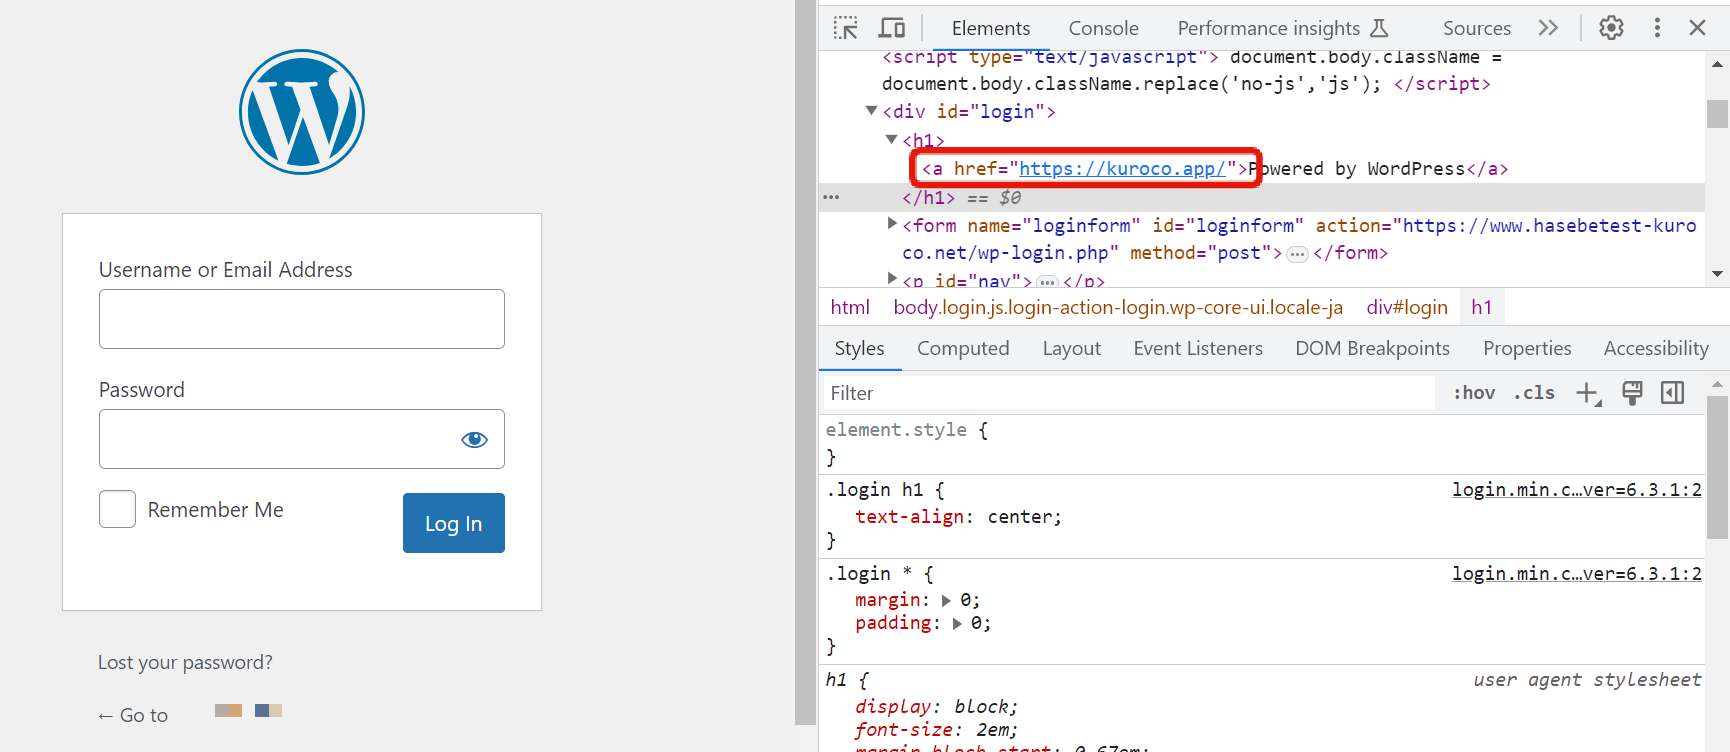
Checking the display
Click the [Preview] button in the upper right corner of the rule editing page to check the display, and you can confirm that the link destination of the logo has been changed.
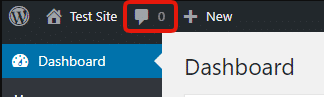
Hiding unnecessary header menus
In this tutorial, we will hide the comment icon and count in the header menu.
Creating a rule
Click on the Response tab on the rule addition page and create a rule as follows.
Execution
| Item | Setting |
|---|---|
| Field setting | HTML editor |
| General | CSS selector: #wp-admin-bar-commentsAction: Hide |
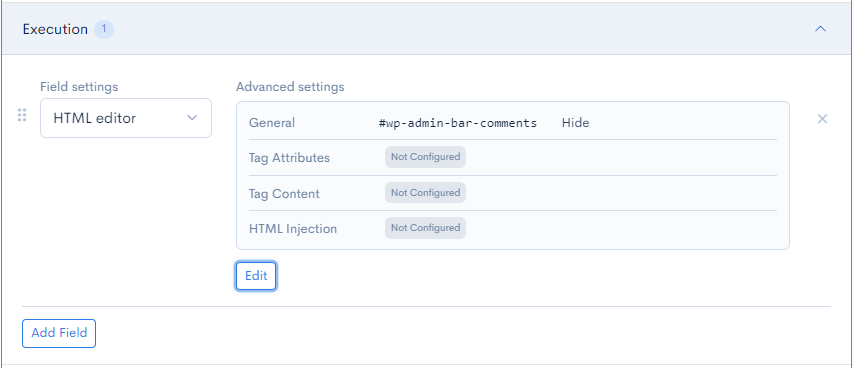
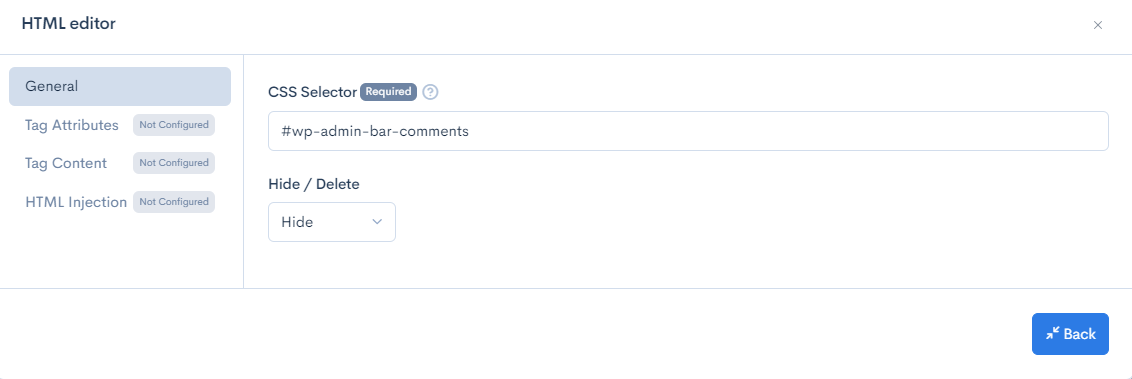
After configuring, click [Update] to save the settings.
Checking the display
Click the [Preview] button in the upper right corner of the rule editing page to check the display, and you can confirm that the comment icon and number are hidden.
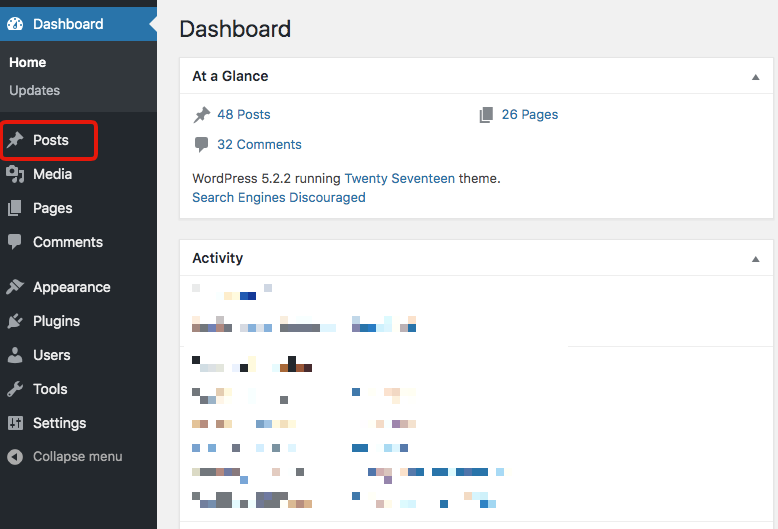
Changing the label of the side menu
Change the label of the side menu. In this tutorial, we will change "Posts" to "Articles" as an example.
Creating a rule
Click on the Response tab on the rule addition page and create a rule as follows.
Execution
| Item | Setting |
|---|---|
| Field setting | Text replace |
| From | Posts |
| To | Articles |
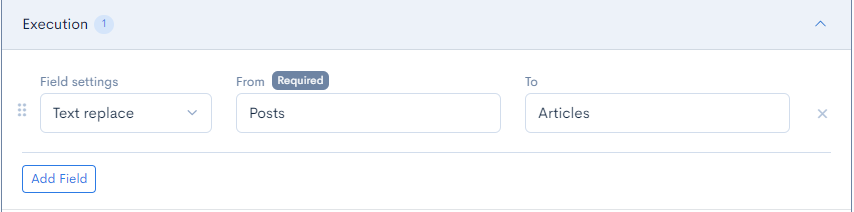
After configuring, click [Update] to save the settings.
Confirming the display
Click the [Preview] button in the upper right corner of the rule editing page to confirm the display, and you can see that the label has been changed.

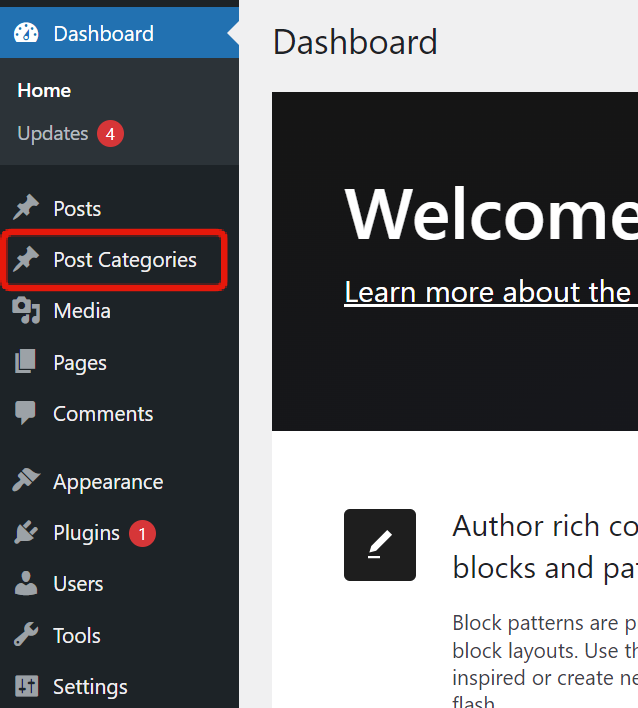
Adding a link to the side menu
Add a new link to the side menu. In this tutorial, we will display the menu under "Posts" as "Post Categories" between "Posts" and "Media".
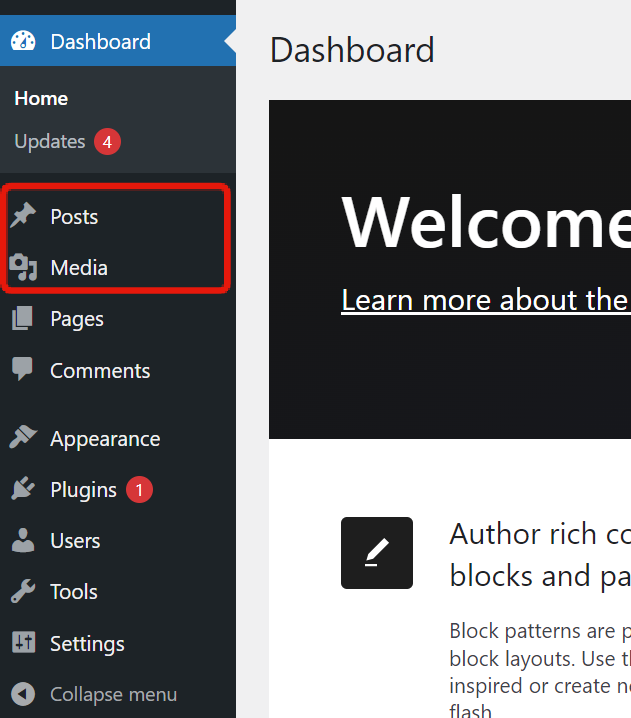
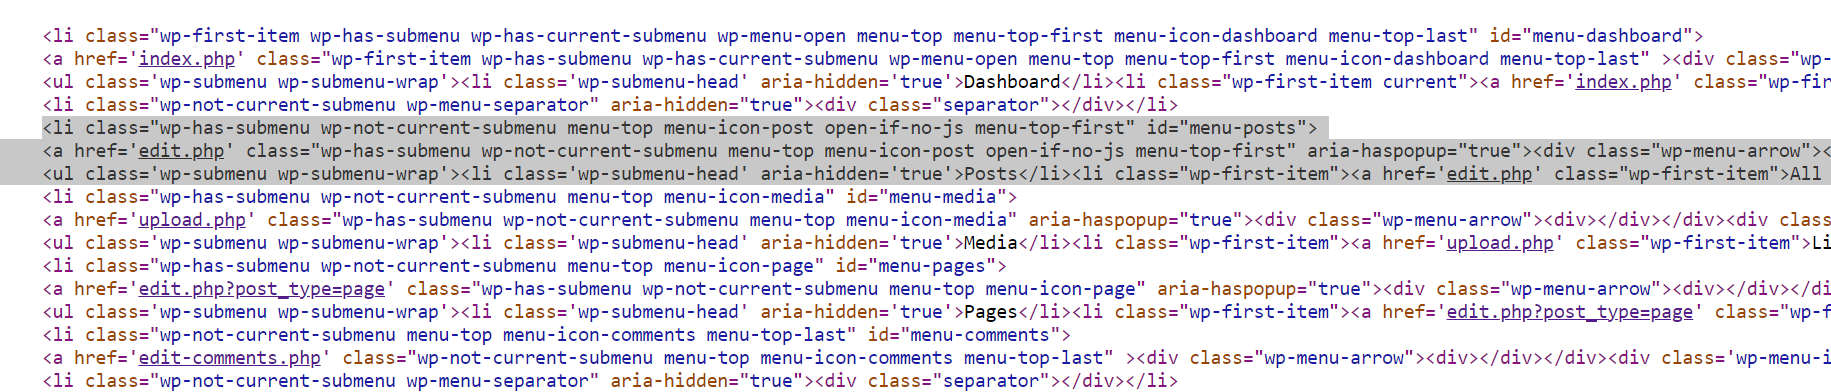
Check and copy the HTML structure
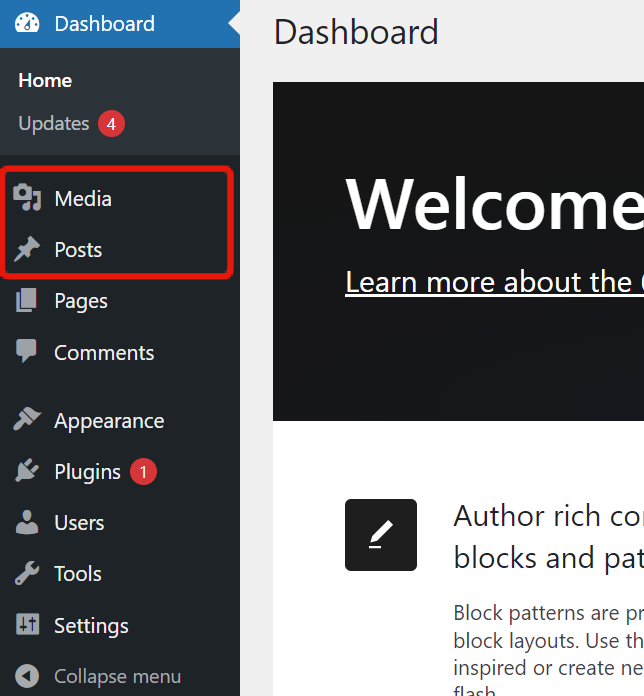
Right-click on the WordPress admin screen and click [View Page Source] from the menu that appears.
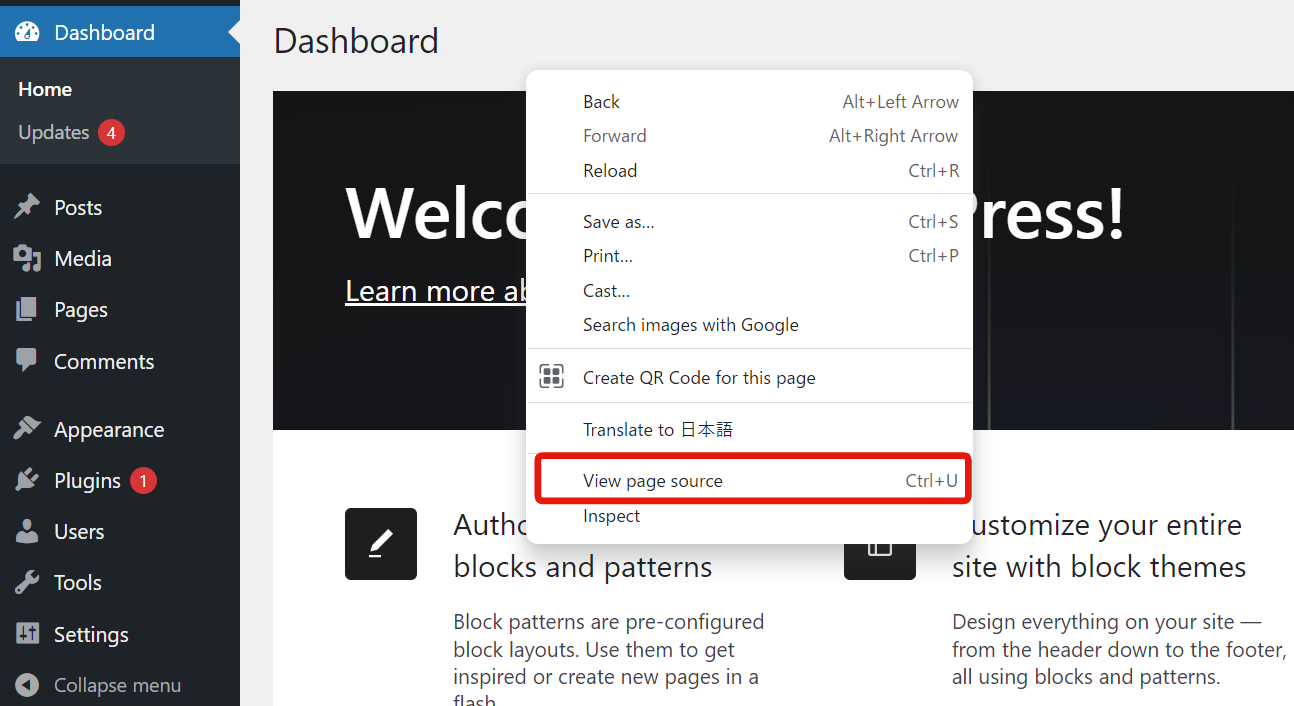
Press "Ctrl+F" on Windows or "cmd+F" on Mac to display the search box, and search for "menu-posts" to check the HTML of the "Posts" section of the side menu.
Copy everything from <li class="wp-has-submenu wp-not-current-submenu menu-top menu-icon-post open-if-no-js menu-top-first" id="menu-posts"> to </li>.
Creating a rule
Click on the Response tab of the rule addition screen and create a rule as follows:
Execution
| Item | Setting |
|---|---|
| Field setting | HTML Editing |
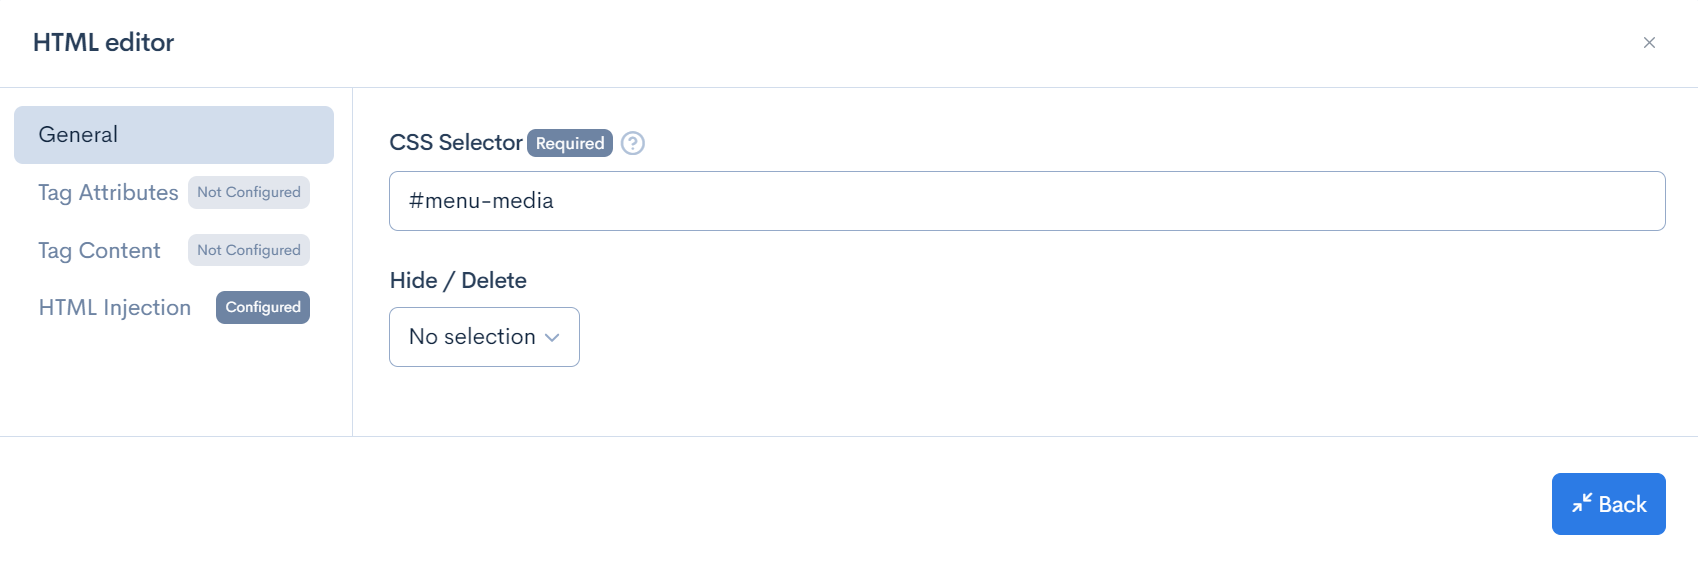
| General | CSS Selector: #menu-posts |
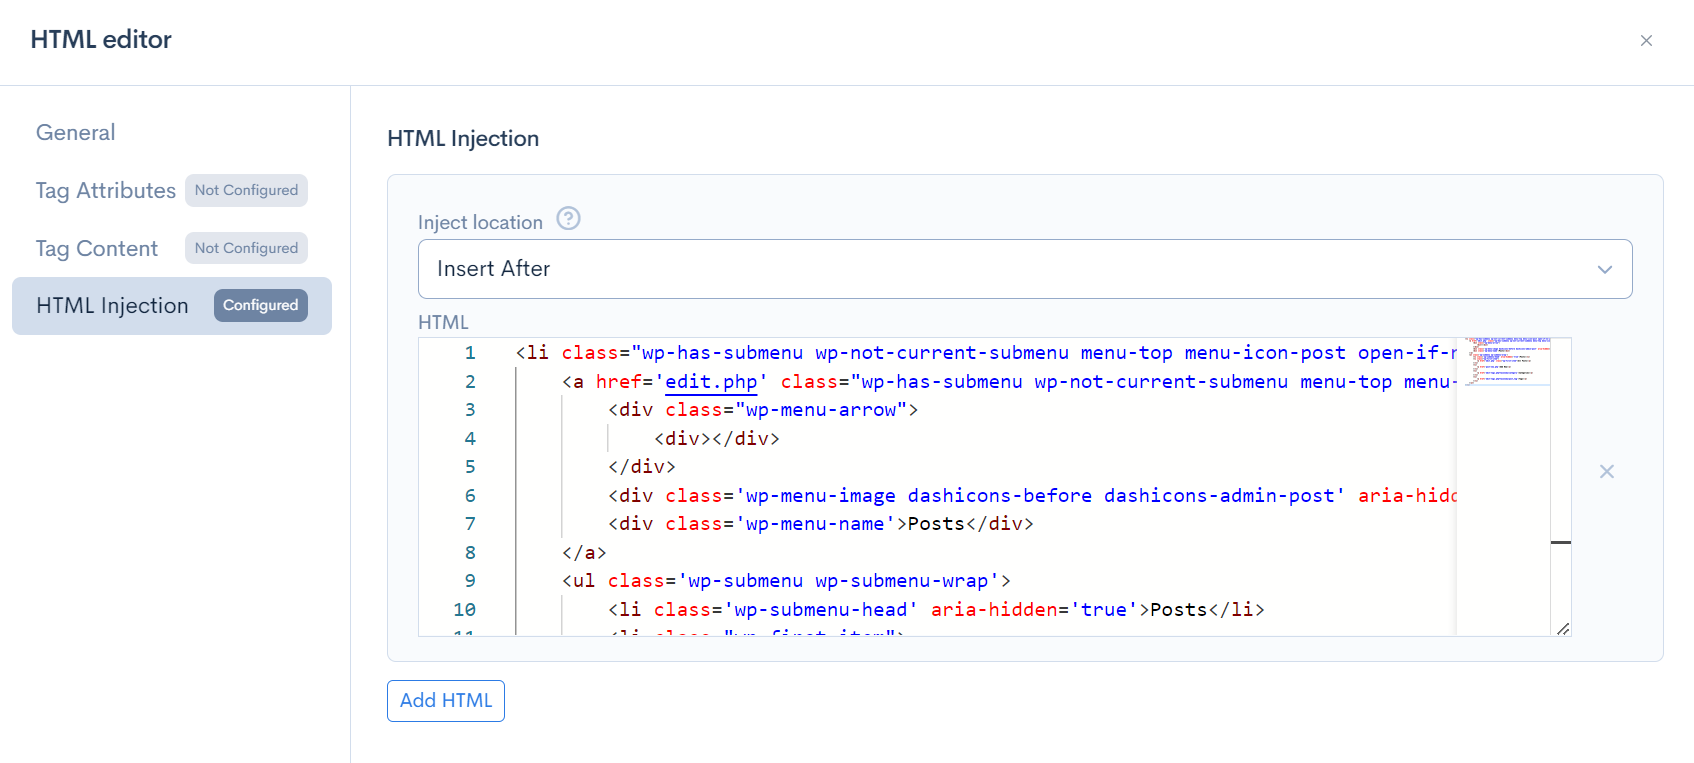
| HTML Insertion | Insertion Position: Insert after the element HTML: Enter the following code by editing the copied code earlier. |
<li class="wp-has-submenu wp-not-current-submenu menu-top menu-icon-post open-if-no-js menu-top-first" id="menu-posts-category">
    <a href='edit-tags.php?taxonomy=category' class="wp-has-submenu wp-not-current-submenu menu-top menu-icon-post open-if-no-js menu-top-first" aria-haspopup="true">
        <div class="wp-menu-arrow">
            <div></div>
        </div>
        <div class='wp-menu-image dashicons-before dashicons-admin-post' aria-hidden='true'><br />
        </div>
        <div class='wp-menu-name'>Post Categories</div>
    </a>
</li>
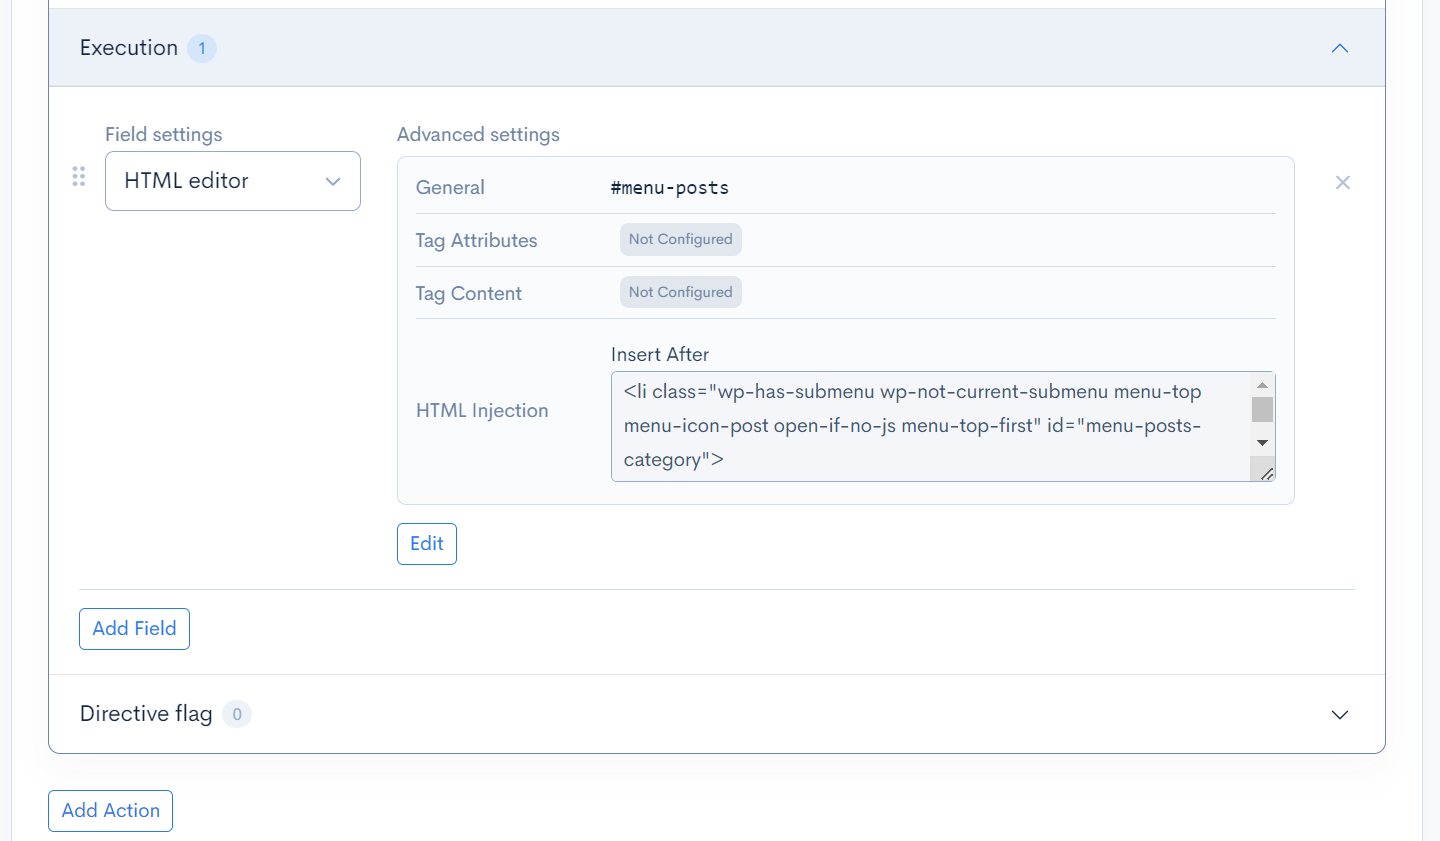

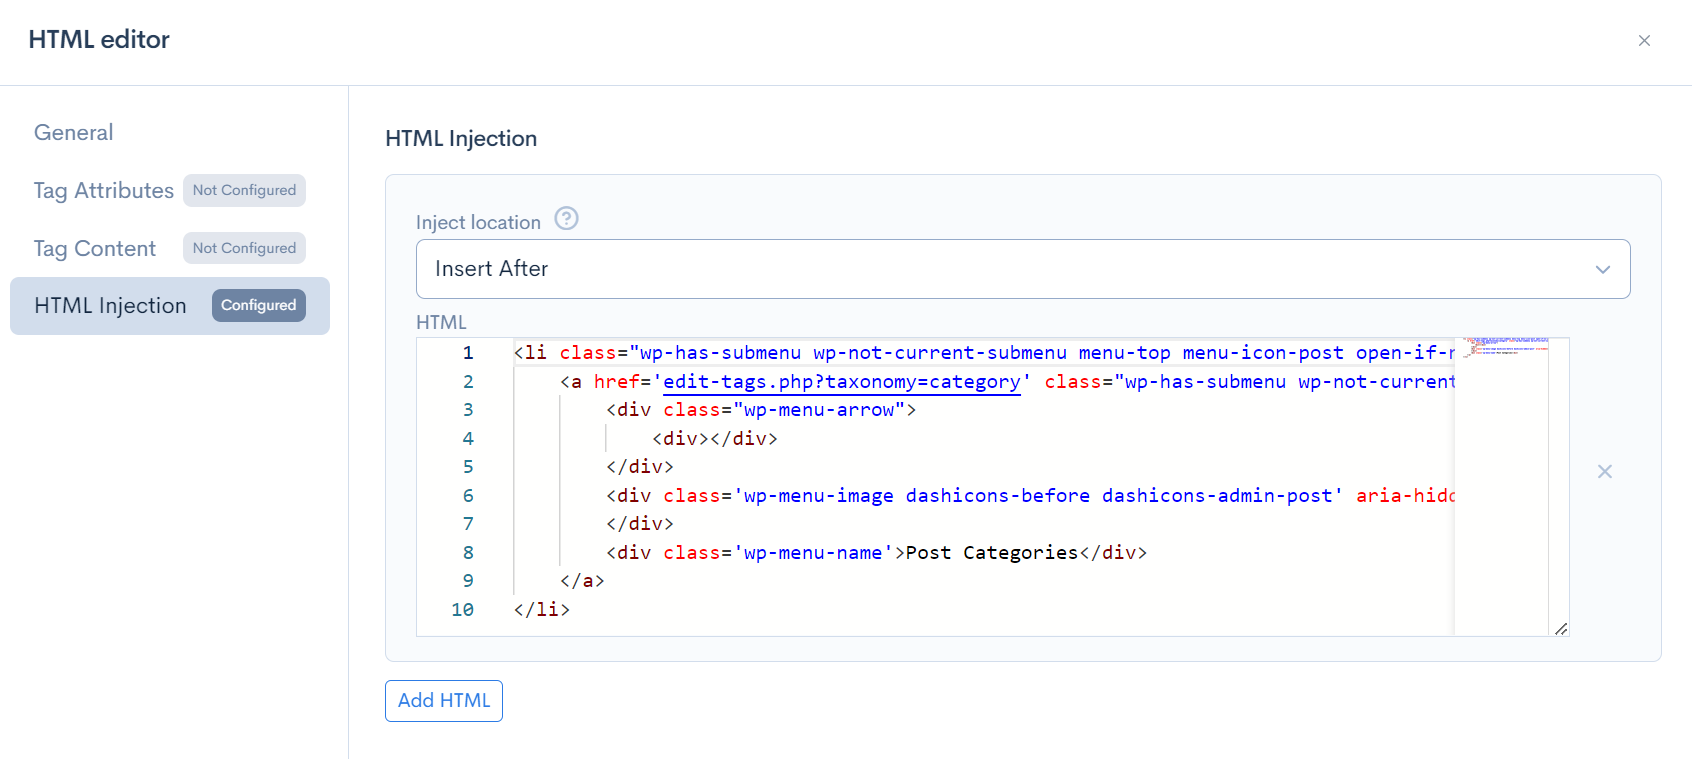
Once the settings are done, click [Update] to save the settings.
Confirming the display
Click the [Preview] button in the upper right corner of the rule editing page to confirm the display, and you can see that the link has been added.
Changing the order of the side menu
Change the order of the side menu. In this tutorial, we will swap the order of "Posts" and "Media".
Check and copy the HTML structure
Right-click on the WordPress admin screen and click [View Page Source] from the menu that appears.
Press "Ctrl+F" on Windows or "cmd+F" on Mac to display the search box, and search for "menu-posts" to check the HTML of the "Posts" section of the side menu. Copy the menu element of "Posts".
Creating Rules
Click on the Response tab of the Add Rule screen and create the following rules.
Execution
Create two items.
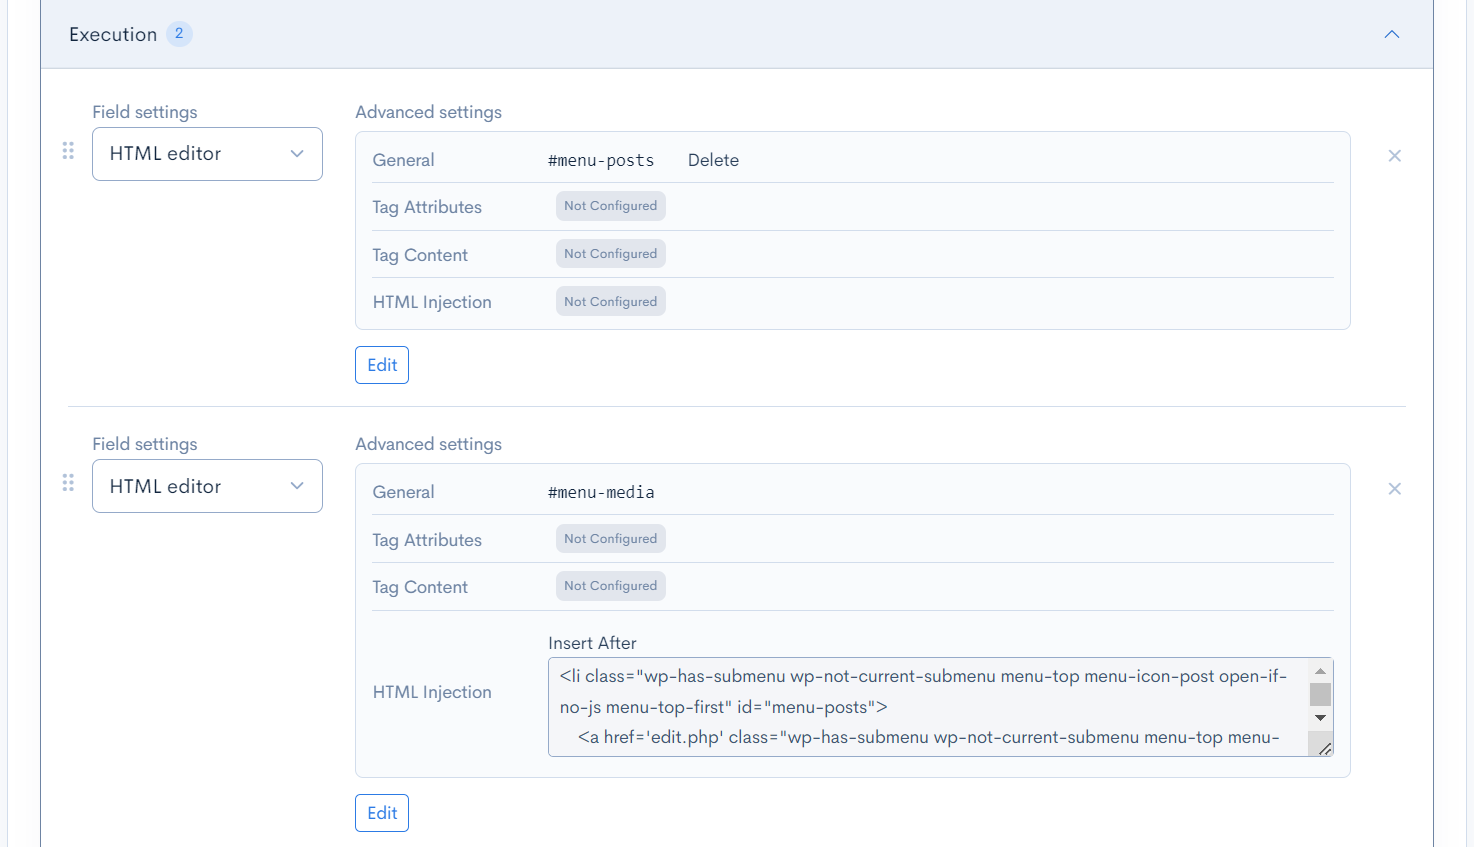
Item 1
| Item | Settings |
|---|---|
| Field settings | HTML editor |
| General | CSS Selector: #menu-postsDelete/Hide: Delete |

Item 2
| Item | Settings |
|---|---|
| Field settings | HTML editor |
| General | CSS Selector: #menu-media |
| HTML Insertion | Insertion Position: Insert after the element HTML: Enter the following code by editing the code copied earlier. |
<li class="wp-has-submenu wp-not-current-submenu menu-top menu-icon-post open-if-no-js menu-top-first" id="menu-posts">
    <a href='edit.php' class="wp-has-submenu wp-not-current-submenu menu-top menu-icon-post open-if-no-js menu-top-first" aria-haspopup="true">
        <div class="wp-menu-arrow">
            <div></div>
        </div>
        <div class='wp-menu-image dashicons-before dashicons-admin-post' aria-hidden='true'><br /></div>
        <div class='wp-menu-name'>Posts</div>
    </a>
    <ul class='wp-submenu wp-submenu-wrap'>
        <li class='wp-submenu-head' aria-hidden='true'>Posts</li>
        <li class="wp-first-item">
            <a href='edit.php' class="wp-first-item">All Posts</a>
        </li>
        <li>
            <a href='post-new.php'>Add New</a>
        </li>
        <li>
            <a href='edit-tags.php?taxonomy=category'>Categories</a>
        </li>
        <li>
            <a href='edit-tags.php?taxonomy=post_tag'>Tags</a>
        </li>
    </ul>
</li>
Once the settings are done, click on [Update] to save the settings.
Check the Display
Click on the [Preview] button at the top right of the Rule Editing page to check the display. You can confirm that the order has been changed.
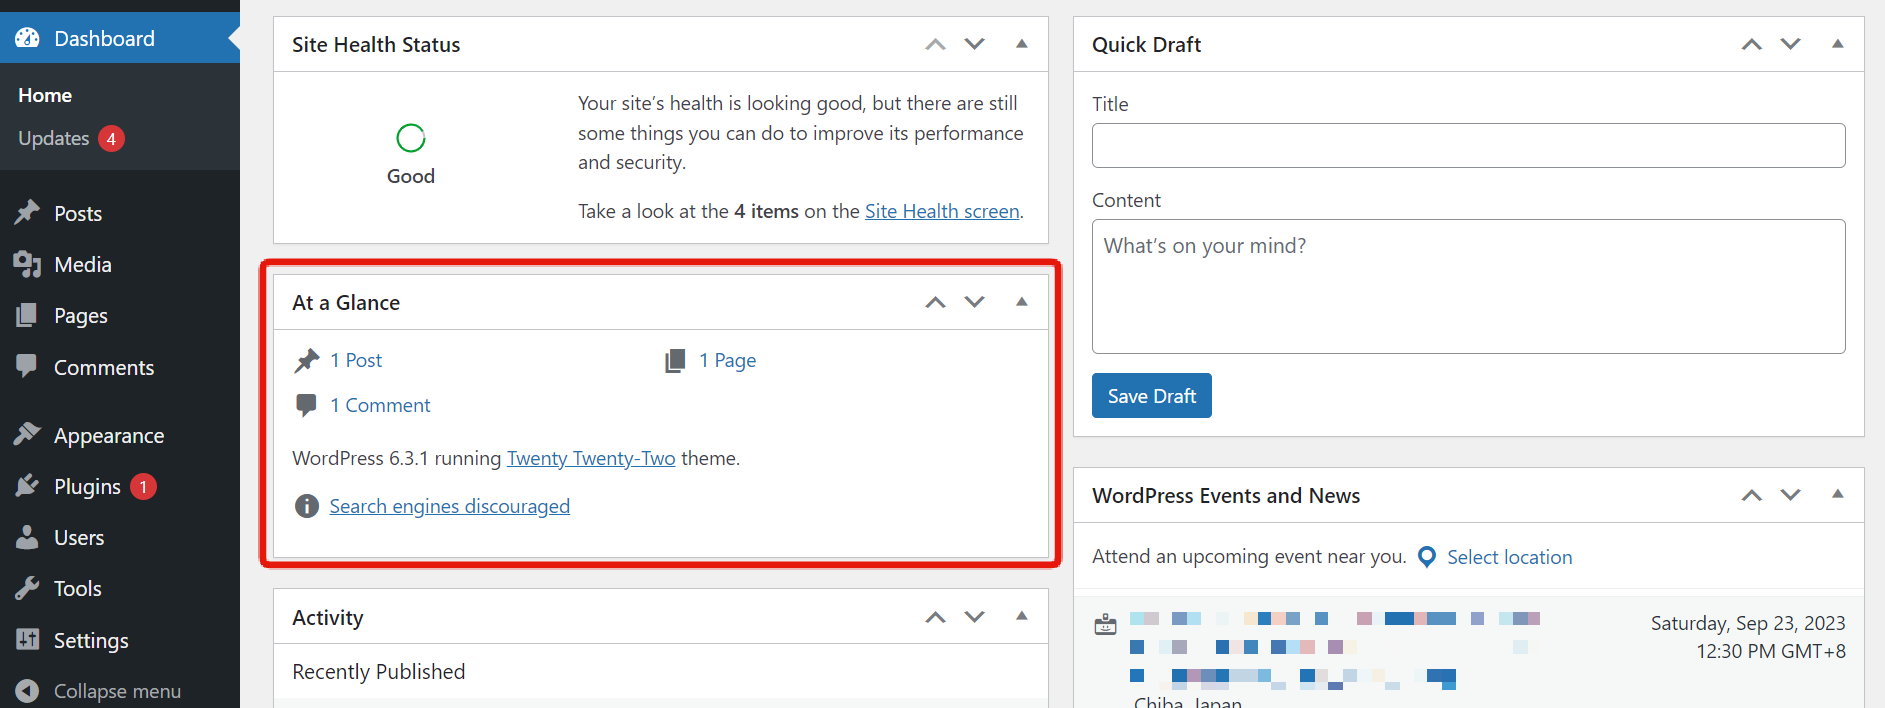
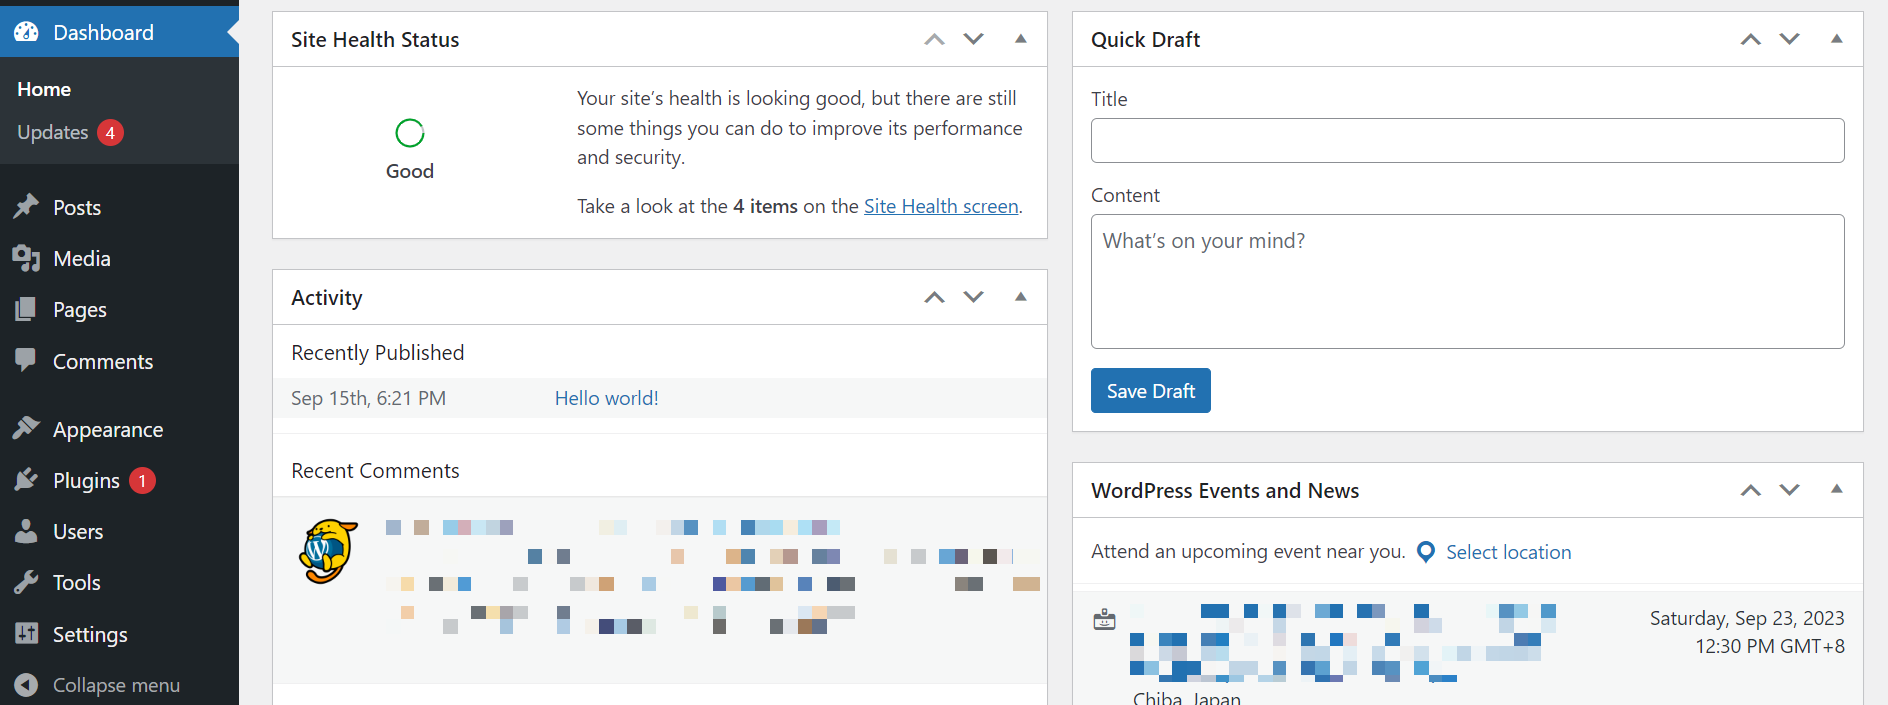
Removing Unnecessary Blocks from the Dashboard
In this tutorial, we will remove the "At a Glance" block as an example.
Creating Rules
Click on the Response tab of the Add Rule screen and create the following rules.
Execution
| Item | Settings |
|---|---|
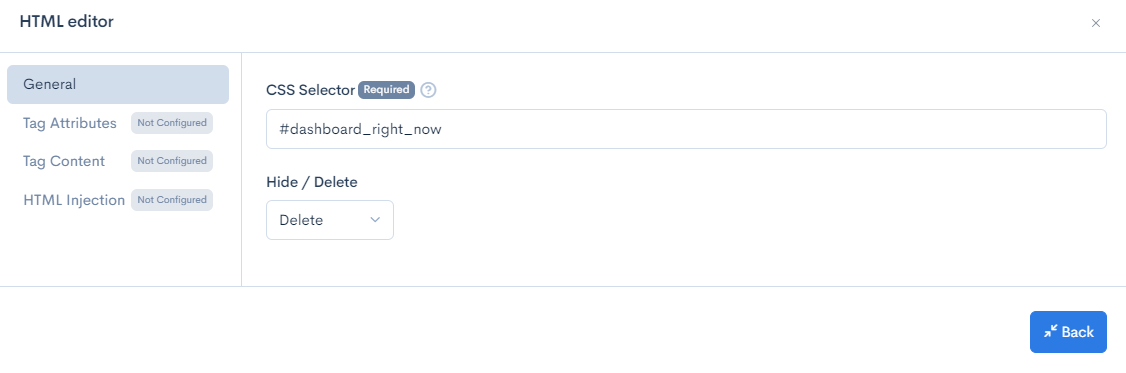
| Field settings | HTML editor |
| General | CSS Selector: #dashboard_right_nowDelete/Hide: Delete |

Check the Display
Click on the [Preview] button at the top right of the Rule Editing page to check the display. You can confirm that the block has been removed.
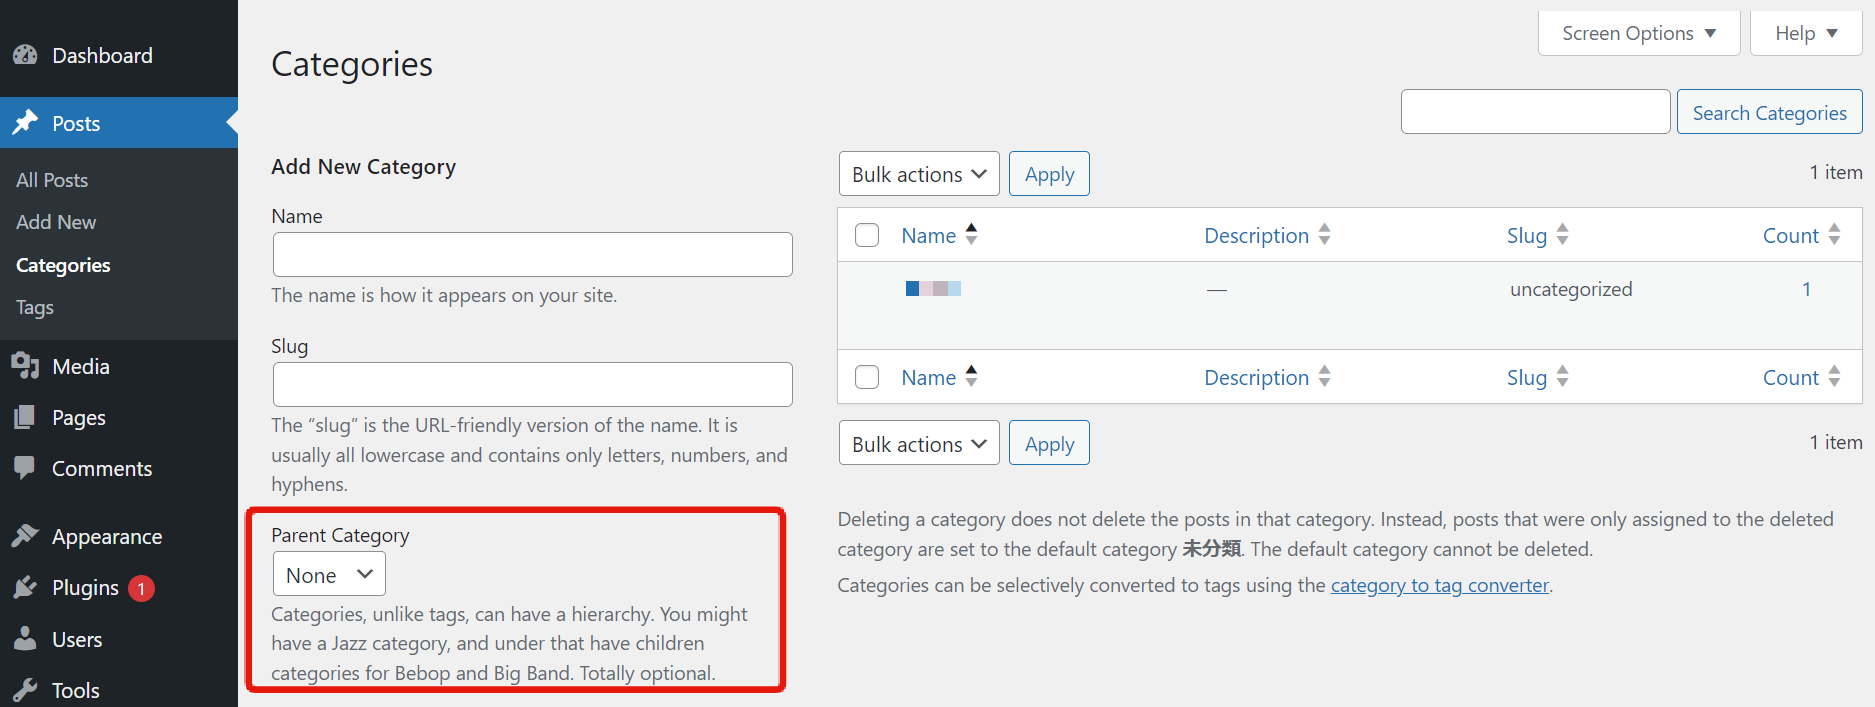
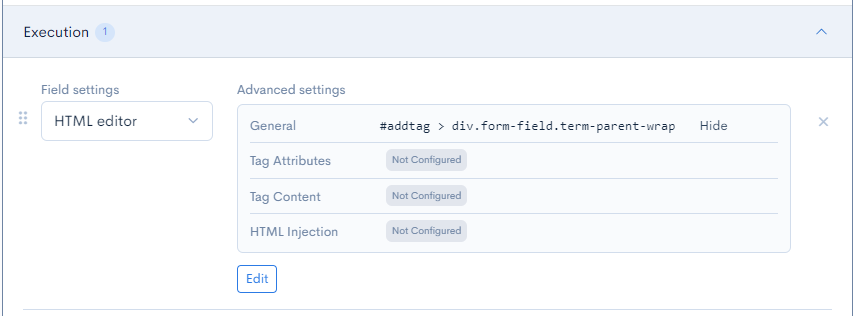
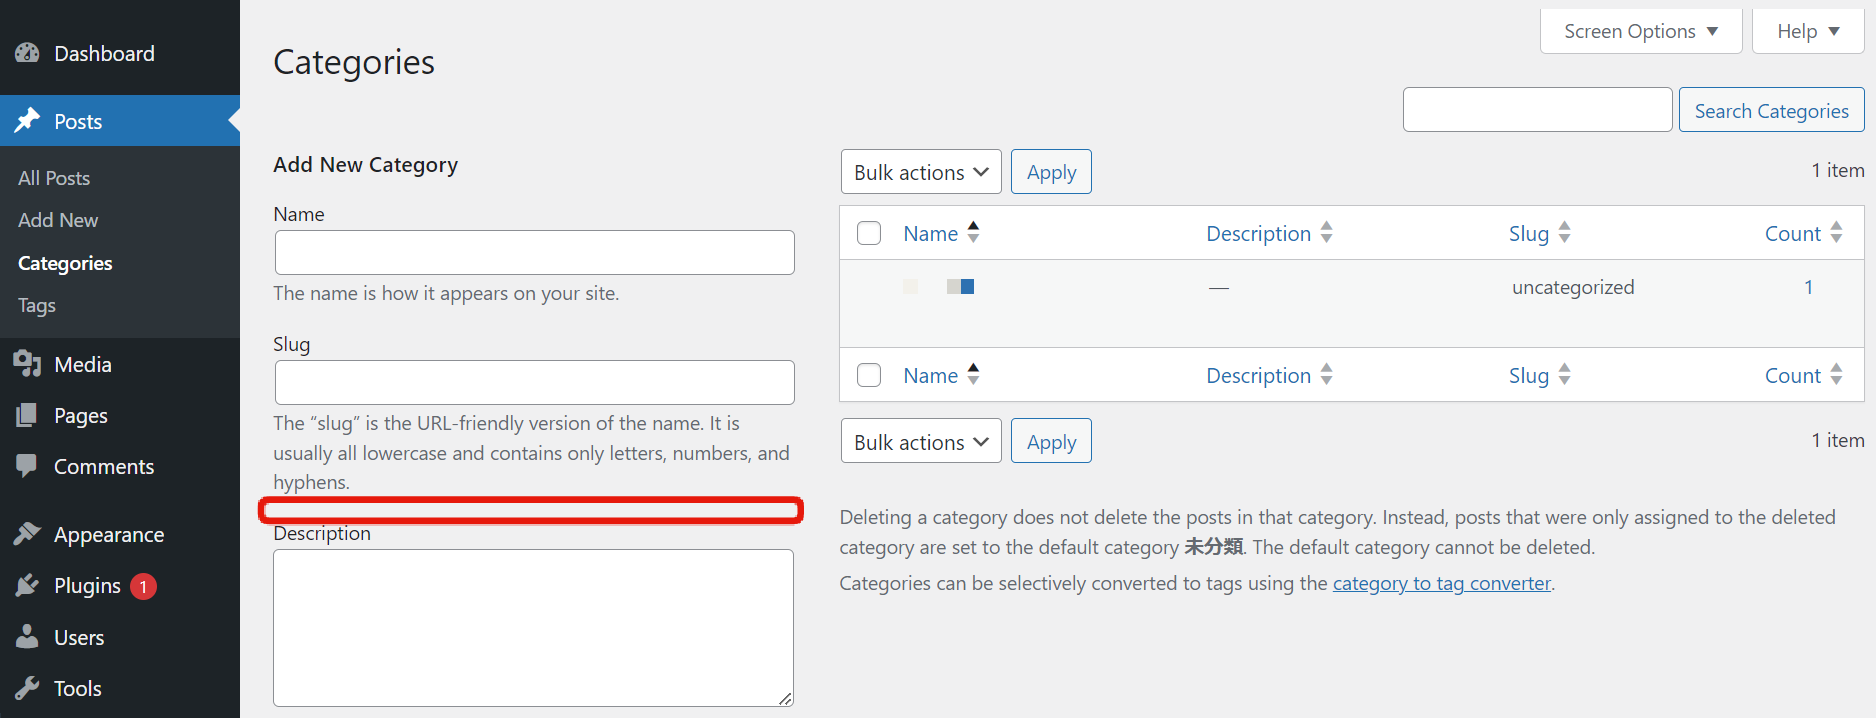
Hiding the Parent Category Setting
Hide the "Parent Category" setting field displayed on the new/edit category page of the post.
Creating Rules
Create the following rules on the Add Rule screen.
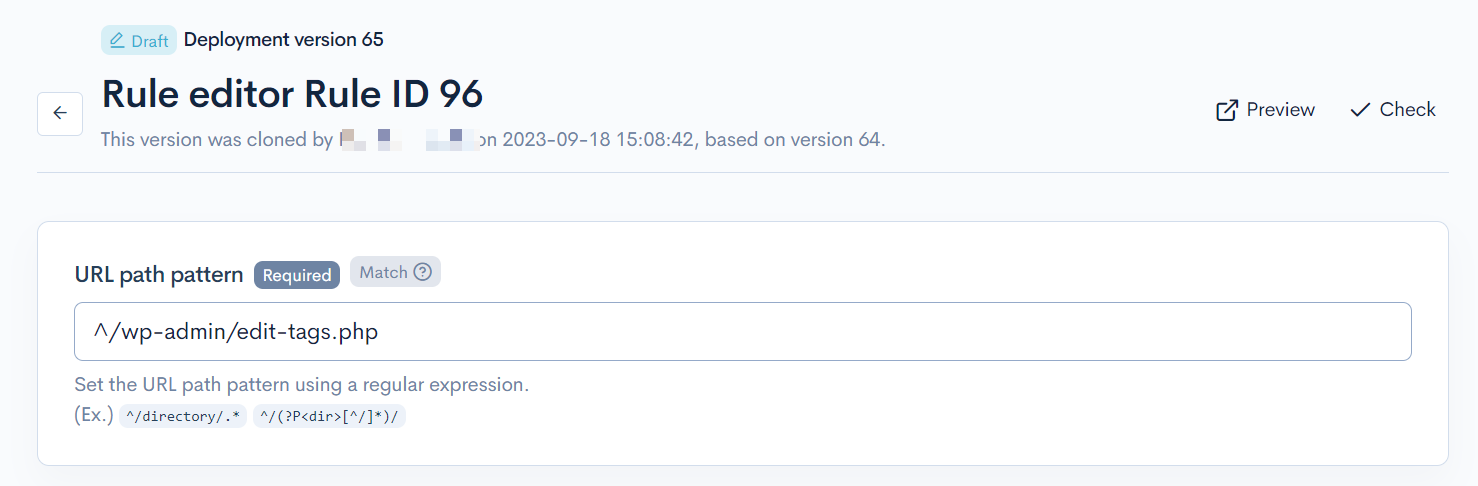
URL Path Pattern to Apply
To limit it to the category editing page in the admin panel, enter ^/wp-admin/edit-tags.php.
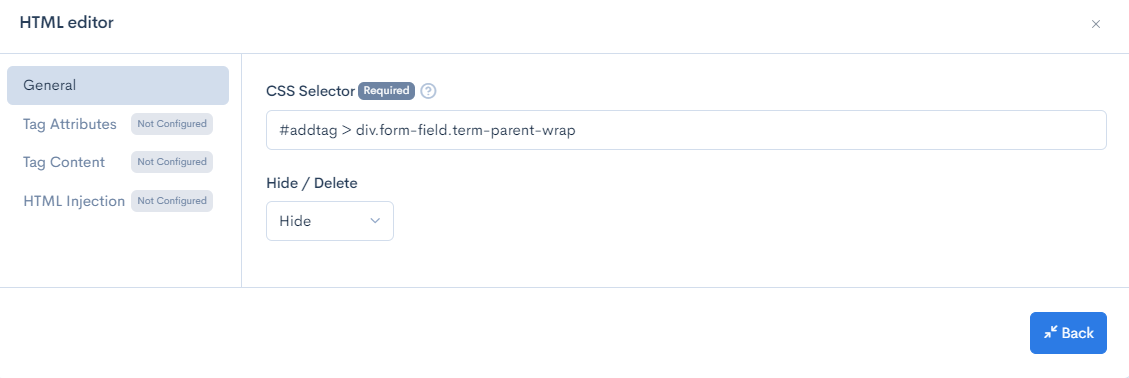
Click on the Response tab and configure as follows.
Execution
| Item | Configuration |
|---|---|
| Item Configuration | HTML editor |
| General | CSS Selector: #addtag > div.form-field.term-parent-wrapRemove/Hide: Hide |
Confirm the Display
Click the [Preview] button in the upper right corner of the rule editing page to confirm the display. You can see that the "Parent Category" field is hidden.
Support
If you have any other questions, please contact us or check out Our Discord Community.